Tech News Today
  • Hardware
    • Motherboards
    • CPUs
    • Graphic Cards
    • RAM
    • SSDs
    • Computer Cases
    • Monitors
    • Peripherals
    • Power Supply Unit
    • PC Builds
    • Computer Tips
  • Software
  • Operating System
    • Windows
    • Mac
    • Linux
  • Gaming
  • Mobile
  • Console
  • More
    • Internet
    • Networking
    • Security
    • Buyer’s Guide
    • Gadgets
    • Laptops
    • Reviews
    • How To
    • News
Facebook Twitter Instagram
Tech News Today
  • Hardware
    • Motherboards
    • CPUs
    • Graphic Cards
    • RAM
    • SSDs
    • Computer Cases
    • Monitors
    • Peripherals
    • Power Supply Unit
    • PC Builds
    • Computer Tips
  • Software
  • Operating System
    • Windows
    • Mac
    • Linux
  • Gaming
  • Mobile
  • Console
  • More
    • Internet
    • Networking
    • Security
    • Buyer’s Guide
    • Gadgets
    • Laptops
    • Reviews
    • How To
    • News
Tech News Today
Home»Virtualization»How to Increase VirtualBox Disk Size

How to Increase VirtualBox Disk Size

Anup ThapaBy Anup ThapaAugust 11, 2022
virtualbox increase disk size

When setting up VMs in VirtualBox, users generally don’t put much thought into how much disk space to assign. However, once you install the Guest OS and start using it regularly, the space tends to get occupied very quickly.

Increasing the amount of disk space assigned to the VMs can be a bit confusing if you’ve never done it before. As such, we’ve detailed the necessary steps to increase the VMs’ disk size in VirtualBox for Windows, Mac, and Linux.

Table of Contents

  • Steps to Increase VirtualBox Disk Size
    • Step 1: Allocate Space to VM
    • Step 2: Increase Allocated Space on Host OS
    • Step 3: Modify Partitions in Guest OS

Steps to Increase VirtualBox Disk Size

The process involves adjusting the space allocated to the VM via VirtualBox, matching the increase on the host OS, and finally managing the unallocated space directly through the guest OS.

Step 1: Allocate Space to VM

As stated, you’ll need to allocate a certain amount of disk space to the VM. Here are the steps to do so:

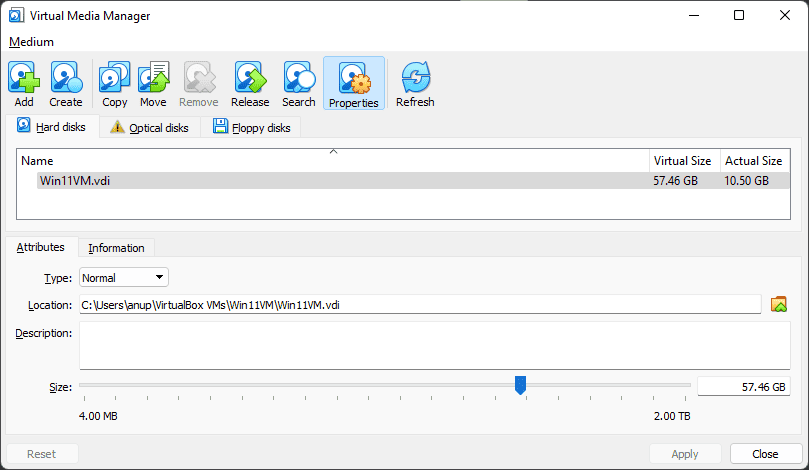
  1. Launch VirtualBox and select File > VirtualMediaManager.
  2. Select the Virtual Disk Image (VDI) you want to modify.
  3. Adjust the size with the slider and press Apply.
    virtual media manager adjust size

If you’re using a VirtualBox version older than 6, you can instead use the command-line steps listed below for resizing. On Linux systems, you can directly use the following command:
VBoxManage modifymedium <vdipath> --resize <sizeinmb>

vboxmanage modifymedium

On Windows, the command is the same. But first, you’ll have to use the following command to add VirtualBox to the PATH variable.
setx PATH "%PATH%;<VirtualBoxPath>"

setx path

Step 2: Increase Allocated Space on Host OS

If the VDI is stored on a partition with plenty of free space, you can skip this step. But if the partition where the VDI is stored doesn’t have any free space, the increased space from the previous step won’t be accessible to the VM.

As such, you’ll have to adjust the host OS’s partitions accordingly. We recommend backing up important files before performing any partitioning tasks.

Windows

On Windows, you can use the Disk Management tool for this step:

  1. Press Win + X and select Disk Management.
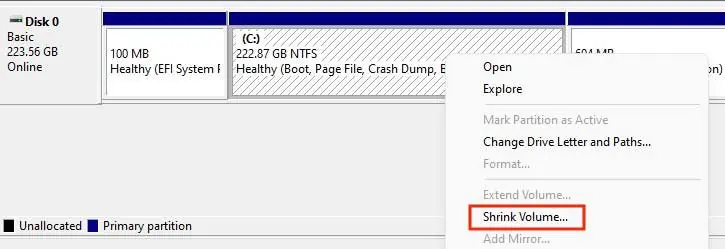
  2. Right-click the partition to shrink some disk space from and select Shrink Volume.
    shrink
  3. Enter the amount to shrink in MB and press Shrink.
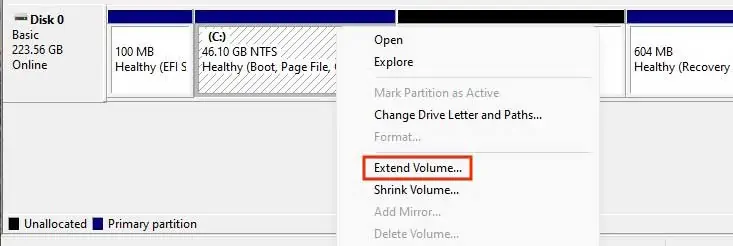
  4. Right-click the VDI partition and select Extend Volume.
  5. Press Next and follow the wizard’s instructions to increase the VDI partition’s disk size.

Mac

On Macs, you can use Disk Utility to manage the partitions:

  1. Press Command + Spacebar and search Disk Utility.
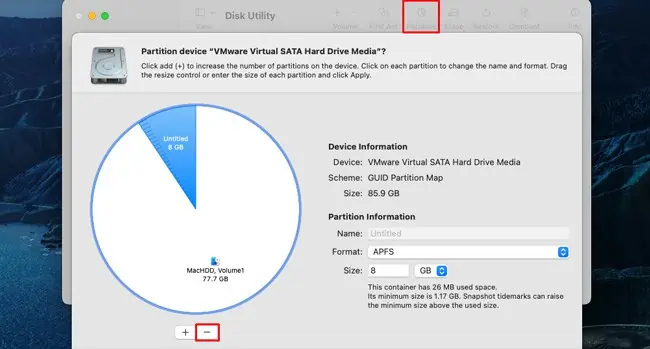
  2. Select the volume to resize from the left pane and click on Partition.
    mac-disk-utility-partition
  3. From the pie chart, select the partition you want to remove and press the Remove (–) button. This will extend the deleted space to the volume you selected in the previous step.
  4. Before applying the changes, do note that all the data on the deleted partition will be lost. Just a quick reminder to backup any important data if you haven’t already done so.

Linux

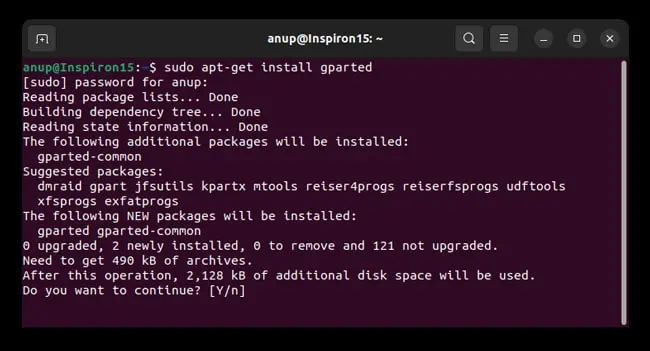
On Linux, you can use your distro’s built-in partition manager or any other reliable option such as GParted:

  1. First, install GParted on Debian-based distros with the following command:
    sudo apt-get install gparted
    On Fedora-based distros, use the su -c "yum install gparted" command instead.
    sudo-apt-get-install-gparted
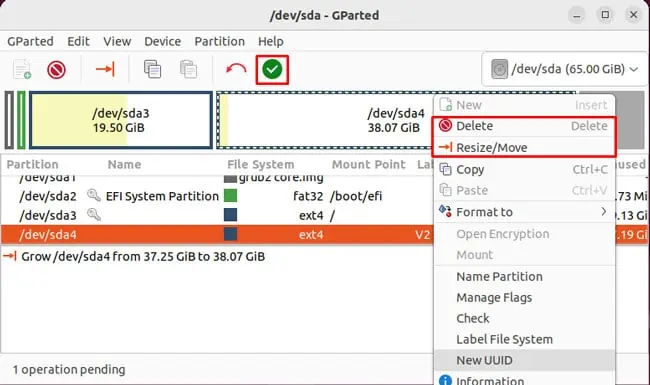
  2. Launch GParted and enter your password to authenticate.
  3. Select the partition from which you want to shrink the space and either Resize it or Delete it.
  4. Select the VDI partition and resize it to include the unallocated space.
    gparted-resize-delete-partition
  5. Check the pending operations list; if it seems good, press the Apply All Operations checkmark.

Step 3: Modify Partitions in Guest OS

First, we increased the disk space assigned to the VM via VirtualBox. Then, we made sure the increased space was matched on the host OS in the second step.

While this space is now accessible to the VMs, it will be unallocated by default. Depending on what guest OS you’ve set up in VirtualBox, you can use the appropriate steps from Step 2 to modify the partitions and make the unallocated space usable.

how-to
Anup Thapa
  • LinkedIn

Anup Thapa is a tech writer at TechNewsToday. He mostly writes informative articles, tutorials, and troubleshooting guides related to Windows systems, networking, and computer hardware. Anup has been writing professionally for almost 5 years, and tinkering with PCs for much longer. His love for all things tech started when he got his first PC over 15 years ago. It was a Pentium IV system running Windows XP on a single 256 MB stick. He spent his formative years glued to this PC, troubleshooting any hardware or software problems he encountered by himself. Professionally, Anup has had brief forays into a variety of fields like coding, hardware installation, writing, etc. In doing so, he's worked with people of different backgrounds and skill levels, from average joes to industry leaders and experts. This has given him not just a versatile skillset, but also a unique perspective for writing that enables him to concisely communicate complex information and solve his reader's problems efficiently. You can contact him at anup@technewstoday.com

Related Posts

virtual machine disks consolidation is needed

4 Ways to Fix “Virtual Machine Disks Consolidation is Needed”

December 27, 2022
virtualbox shared folder

How to Create Shared Folder on Virtualbox

November 29, 2022
failed to open a session for the virtual machine

How to Fix “Failed to Open a Session For The Virtual Machine” Error?

September 30, 2022
how to uninstall virtualbox

How to Uninstall VirtualBox on Windows

September 28, 2022
how to use vmware

How to Use VMware (Detailed Guide)

September 23, 2022
virtualize a physical machine vmware

How To Virtualize A Physical Machine With VMware

September 17, 2022
Add A Comment

Leave A Reply Cancel Reply

Latest Posts
what-does-collate-mean-on-a-printer

What Does Collate Mean on a Printer?

March 31, 2023
usb-vs-pcie-wifi

USB Vs PCIe Wi-Fi—Which One is Better?

March 31, 2023
how often to replace laptop

How Often Should You Replace a Laptop

March 29, 2023
You may also like
computer suddenly slow

Why is My Computer Suddenly Slow? 11 Ways to Fix It

March 31, 2023
HTTP-Error-431

How to Fix HTTP Error 431

March 31, 2023
scheduled task reboot

How to Create a Reboot Scheduled Task in Windows

March 31, 2023
Recommended
Cookie Clicker Garden Guide

Cookie Clicker Garden Guide to Unlocking Every Seed

September 26, 2021
monitor no signal

Computer Turns On But Monitor Says No Signal (9 Ways To Fix)

November 10, 2022
Facebook Twitter Pinterest
  • Home
  • About Us
  • Our Team
  • Editorial Guidelines
  • Privacy Policy
  • Affiliate Disclosure
© 2023 TechNewsToday, editor@technewstoday.com | Tech Central Pvt. Ltd.

Type above and press Enter to search. Press Esc to cancel.