Using the integrated graphics card along with a dedicated one is a good idea if you want to have a multi-monitor setup on your PC. However, most ASRock motherboards disable the iGPU whenever you install an external video card.
You will need to enable the iGPU in such cases. It is possible to do so from the Chipset Configuration or AMD CBS settings on the Advanced tab of ASRock’s UEFI/BIOS interface.
Make sure your CPU has an integrated graphics processor. You can check the official specifications of the CPU to get this information. Then, follow the step by step guide I have provided below to enable/disable the iGPU on your ASRock motherboard.
Get to BIOS/UEFI
You need to access the Advanced BIOS setup utility or UEFI firmware settings to be able to change this setting. You can generally use the BIOS key on startup to access this interface.
- Press F2 or Del key after you get to the ASRock logo screen to get into the BIOS/UEFI interface. You can also keep dressing this key as soon as your computer starts to get the timing right.

- If it loads the EZ mode interface, press F6 to get to Advanced Mode.

If you have enabled Ultra Fast Boot, you can’t use the BIOS key. In such cases, you need to access the Advanced Startup options and then select Troubleshoot > Advanced options > UEFI Firmware Settings > Restart to load the BIOS/UEFI.
Enable Integrated Graphics Settings
Now, you need to search for the necessary setting in the UEFI Advanced mode interface and change it accordingly.
Depending on your motherboard model and its BIOS version, the UEFI interface will be slightly different even with the same type of CPU. So while I have provided the most common steps for this process, you may need to do something else on your end.
If you can’t find the options from the steps below, I recommend checking out the official page of your motherboard. There, go to its support tab and view the user manual or BIOS setup guide to learn what you need to do. If the guide doesn’t clarify the process, check out forums or seek help from support personnel.

On Most Motherboards with Intel CPU
- Go to the Advanced tab and select Chipset Configuration.
- Check the Primary Graphics Adapter setting and make sure it is PCI Express. It’s best to have your discrete graphics card, which is connected to the PCI Express lane, as the primary video adapter.
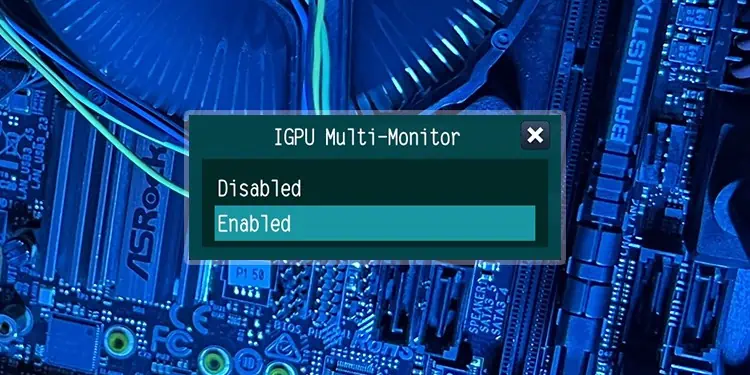
- Scroll down to IGPU Multi-Monitor and select this option.
- If it is Disabled, it means that your computer disables the integrated graphics processor when a dedicated one is connected to the computer. Set it to Enabled if you want to enable the integrated GPU.
- Then, select Share Memory. It determines the portion of RAM that your integrated graphics will be using as its video memory.
- Set it per your preference. You can also leave it as Auto if you don’t want to set a custom value.


On Most Motherboards with AMD CPU
- Go to the Advanced tab and select AMD CBS.
- Go inside NBIO Common Options and select GFX Configuration. If this setting does not appear, you may need to disable CSM and enable 4G Decoding first.
- Select Integrated Graphics Controller. Set it to Forces and press Enter.
- Set UMA Mode to UMA_Auto or UMA_Specified. UMA stands for Unified Memory Architecture and it basically refers to the iGPU’s technology.
- If you set it to UMA_Specified, you need to have a proper value in the UMA Frame Buffer Size. It is the portion size of RAM that the integrated GPU will use as the video memory. Usually, you can set it as 1G or 2G for a good performance.
- If you see iGPU Configuration instead of Integrated Graphics Controller and UMA Mode, directly set it to UMA_AUTO or UMA_SPECIFIED and set the UMA Frame Buffer Size accordingly.


Note: For some motherboards, it may not be possible to enable or disable the integrated graphics on the BIOS. In such cases, check for BIOS updates on the support tab.
The BIOS update description will show all the changes in the update. If the description for a version shows any relevant changes, you can update your BIOS to this version and perform the necessary steps.
Save Configuration and Close UEFI/BIOS
Once you have done everything, you need to save these changes to apply them and then get out of the BIOS/UEFI.
- Go to the Exit tab and select Save Changes and Exit.
- Select Yes to save the configuration changes and exit the BIOS.

Then, check if integrated graphics is really enabled from the Performance tab of the Task Manager.
Also, keep in mind that you may only see the screen output from the dedicated graphics card during startup or while accessing the BIOS. But on normal Windows, you should get the output from both graphics processors.