Tech News Today
  • Hardware
    • Motherboards
    • CPUs
    • Graphic Cards
    • RAM
    • SSDs
    • Computer Cases
    • Monitors
    • Peripherals
    • Power Supply Unit
    • PC Builds
    • Computer Tips
  • Software
  • Operating System
    • Windows
    • Mac
    • Linux
  • Gaming
  • Mobile
  • Console
  • More
    • Internet
    • Networking
    • Security
    • Buyer’s Guide
    • Gadgets
    • Laptops
    • Reviews
    • How To
    • News
Facebook Twitter Instagram
Tech News Today
  • Hardware
    • Motherboards
    • CPUs
    • Graphic Cards
    • RAM
    • SSDs
    • Computer Cases
    • Monitors
    • Peripherals
    • Power Supply Unit
    • PC Builds
    • Computer Tips
  • Software
  • Operating System
    • Windows
    • Mac
    • Linux
  • Gaming
  • Mobile
  • Console
  • More
    • Internet
    • Networking
    • Security
    • Buyer’s Guide
    • Gadgets
    • Laptops
    • Reviews
    • How To
    • News
Tech News Today
Home » Motherboards

How To Enable TPM In MSI BIOS

Anup ThapaBy Anup ThapaAugust 24, 2023
enable tpm msi bios

Most modern MSI boards support TPM 2.0 in the form of a discrete hardware chip (dTPM) or through firmware-based implementations like fTPM (AMD) or PTT (Intel). As TPM 2.0 is an official requirement for Windows 11, you’ll need to enable one of these solutions to install the OS.

This is a simple two-step process. First, go to the Trusted Computing tab in the MSI BIOS and enable the TPM function with the Security Device Support. Then, select the TPM device to use (firmware or hardware TPM).

This went smoothly on almost all the systems that I tested. But I had an old Z87-G45 GAMING board where I had manually installed a TPM 2.0 chip. Despite enabling TPM in the BIOS, it didn’t get detected on this system. If you’re in a similar situation, I’ll cover the full steps to enable TPM and solve such issues in this article.

Table of Contents

  • Access MSI BIOS Interface
  • Enable TPM In BIOS
    • AMD Motherboard
    • Intel Motherboard
    • MSI Laptops
  • Verify TPM Status

Access MSI BIOS Interface

Power on your PC and continuously tap Del/F2 to enter the MSI BIOS.

msi post screen bios key

In case you have enabled Fast Boot, the BIOS may not show up despite spamming the BIOS key. You can use an alternate method in this case.

Reboot your PC 3 times in a row using the restart button. The system will boot to WinRE. There, select See Advanced Repair Options > Troubleshoot > Advanced Options > UEFI Firmware Settings.

Enable TPM In BIOS

In the MSI BIOS, press F7 (if required) to switch to Advanced Mode. Then, follow the appropriate steps to enable and configure TPM.

AMD Motherboard

  1. Go to Settings > Security > Trusted Computing.
    msi-bios-trusted-computing
  2. Set Security Device Support to Enable here. This will enable the TPM function.
    msi-security-device-support
  3. Configure the fTPM switch option to use the firmware or hardware TPM as you prefer. There’s no meaningful difference between the two for most users.
    msi-amd-cpu-ftpm-switch
  4. Press F10 to save the changes and exit the BIOS.

Depending on the exact board, BIOS, and TPM versions, you may be able to configure additional options. My B550M Mortar with TPM 2.0 only lets me set the TPM device version (which you can just leave to Auto).

Intel Motherboard

  1. Select Settings > Security > Trusted Computing. On some boards, you may have to open the Security tab from the bottom right instead.
    msi-bios-security-tab
  2. Set Security Device Support to Enable to turn on the TPM function.
    msi-enable-security-device-support
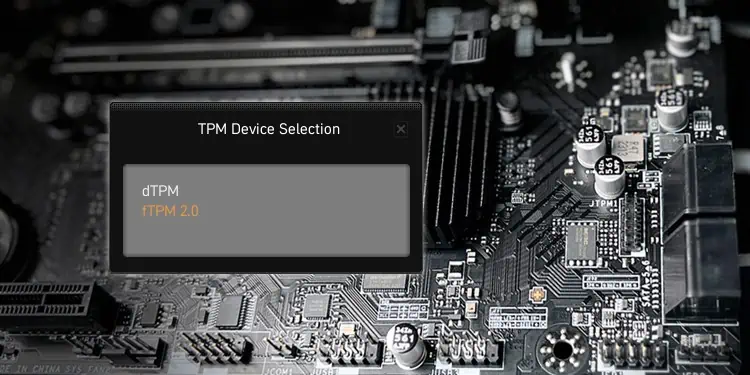
  3. Configure TPM Device Selection to choose between the discrete TPM or firmware TPM (PTT).
    msi-bios-tpm-device-selection-dtpm-ftpm
  4. Press F10 and select Yes to save the changes and exit.

If supported by your board, BIOS version, and TPM version, you can also configure advanced settings like PCR Banks, Platform Hierarchy, etc. But these are best left to the defaults. 

The only option relevant to most users is the Pending operation (TPM Clear) function. This resets the TPM to an unowned state, clears all TPM keys, and removes access to any TPM-encrypted data.

If you ever need to clear the TPM, I recommend doing it with OS-based utilities like Windows’ tpm.msc instead of this BIOS option.

MSI Laptops

The steps are usually the same on MSI laptops as well. But sometimes, the Trusted Computing option may be missing from the BIOS. In that case, press Right Shift + Right Ctrl + Left Alt and then press F2. This will bring up the Trusted Computing option and you can continue with the same steps as above afterward.

Verify TPM Status

After enabling TPM in the BIOS, it’s important to verify that the change was successful. If you can boot to Windows, you can do this from the TPM Management Console. Press Win + R, type tpm.msc, and press Enter.

tpm management console on local computer

You’ll find its status as TPM is ready for use. Or if you’re trying to install Windows, you should be able to proceed without being blocked by the TPM 2.0 requirement error.

In case the TPM is not detected, you have a few options:

  1. You can bypass the TPM requirement to install Windows 11.
  2. If you’re trying to enable it for different purposes, go back to the BIOS and verify that you saved the settings properly after enabling TPM.
  3. Check MSI’s list of TPM 2.0 ready motherboards to confirm that your board supports TPM 2.0. My Z87-G45 board didn’t support TPM 2.0, which is why the module I installed didn’t work in my case.
  4. If your board is compatible, check this linked article for in-depth steps on troubleshooting a TPM device that’s not detected.
how-to
Anup Thapa
  • Instagram
  • LinkedIn

Anup Thapa primarily covers Windows systems, networking, and computer hardware at TechNewsToday. Anup has been writing professionally for almost 5 years, and tinkering with PCs for much longer. His love for all things tech started when he got his first PC over 15 years ago. It was a Pentium IV system running Windows XP on a single 256 MB stick. He spent his formative years glued to this PC, troubleshooting any hardware or software problems he encountered by himself. Professionally, Anup has had brief forays into a variety of fields from coding and hardware installation to writing. In doing so, he's worked with people of different backgrounds and skill levels, from average joes to industry leaders and experts. This has given him not just a versatile skill set, but also a unique perspective for writing that enables him to concisely communicate complex information and solve his reader's problems efficiently. You can reach out to him at anup@technewstoday.com.

Related Posts

motherboard chipset

Understanding Motherboard Chipset and Its Importance

September 20, 2023
best pattern to apply thermal paste

Best Thermal Paste Pattern: 5 Methods Tested

September 18, 2023
how-to-print-without-a-printer

How to Print Without a Printer

September 18, 2023
how to update motherboard drivers

How to Update Motherboard Drivers

September 18, 2023
msi raid

How To Create A RAID Array On MSI Motherboard

September 17, 2023
printer-keeps-going-offline

How to Fix Your Printer That Keeps Going Offline

September 16, 2023
Add A Comment

Leave A Reply Cancel Reply

Latest Posts
how to turn off hardware acceleration

How to Turn Off Hardware Acceleration

September 22, 2023
motherboard chipset

Understanding Motherboard Chipset and Its Importance

September 20, 2023
Naval-Warfare-Games

Best Naval Warfare Games

September 18, 2023
You may also like
printer-not-printing

How to Fix a Printer That’s Not Printing

September 26, 2023
Share Location With Friends and Family

Share Location With Friends and Family (iPhone and Android)

September 18, 2023
how-to-print-without-a-printer

How to Print Without a Printer

September 18, 2023
Recommended
Cookie Clicker Garden Guide

Cookie Clicker Garden Guide to Unlocking Every Seed

September 26, 2021
monitor no signal

Computer Turns On But Monitor Says No Signal (9 Ways To Fix)

November 10, 2022
Facebook Twitter Pinterest
  • Home
  • About Us
  • Our Team
  • Editorial Guidelines
  • Privacy Policy
  • Affiliate Disclosure
© 2023 TechNewsToday, editor@technewstoday.com | Tech Central Pvt. Ltd.

Type above and press Enter to search. Press Esc to cancel.