
You can change the paper size on your HP printer right after initiating the print process. For example, press Ctrl + P . This opens up the Print window. Here, choose the appropriate paper size and click Print.
As you can see, here I have changed the paper size from Legal to A4 in MS Word to print my office documents:

Yet, there are some apps (like WordPad, Notepad, etc.) where you can’t find the option to change paper size.
In such cases, you should change the paper size from Printing Preferences. Apart from that, you may also use the HP Smart app or touch screen, if available.
Via Printing Preferences of Your Printer
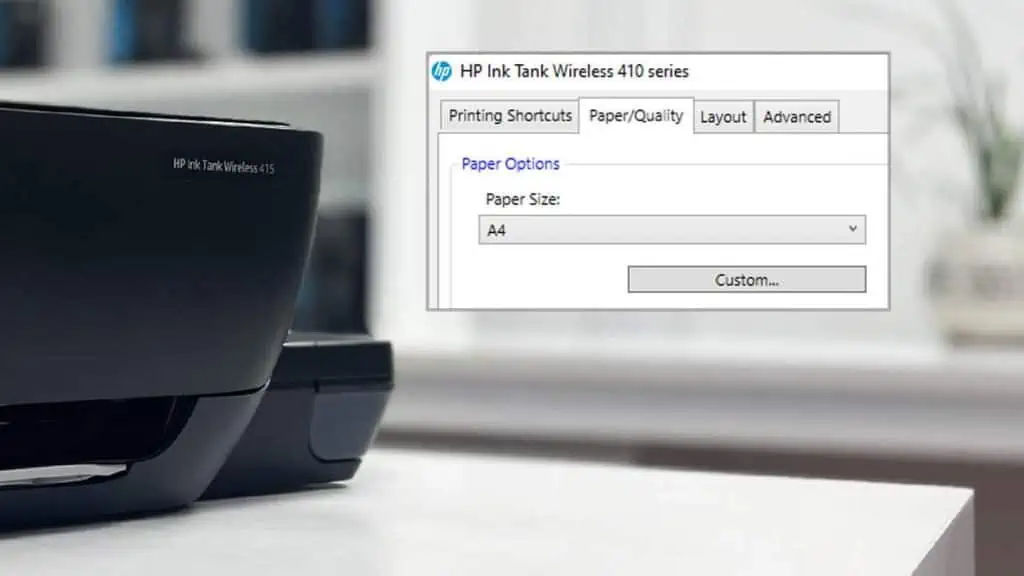
Using Printing Preferences is the standard method to change the paper size on any printer. And guess what? HP printers are no exception in this regard.
However, do note that you should install the printer driver beforehand to access Printing Preferences.
Well, I believe you have already installed this software on your computer. With that being said, here are the steps to change the paper size on your HP printer:
- Open Settings and go to the Printers & scanners section.

- Select your printer.
- Choose the Printing preferences option.
- Jump to the Paper/Quality tab.
- Specify your preferred paper size in the Paper Size drop-down. In my case, it is currently set to Legal. Since I am printing my office documents, I’ll be selecting A4 here.
- For custom size, click the Custom button.
- Select New.
- Give a Name to your custom paper size. Do not give a name that coincides with the name of other existing sizes.
- Define the Width and Height in Inches and click OK.


It may even end up printing documents with readability and alignment issues. Sometimes, you may also encounter an out of paper error even though you have sufficient papers.
Using HP Smart
If you print via HP Smart, you’ll also find an in-app setting to change the paper size there. Here are the required steps:
- Open the HP Smart app. Then, click Printer Settings.
- Go to Advanced Settings. It will redirect you to the printer’s Embedded Web Server.
- Navigate to Settings tab > Preferences > Tray and Paper Management.
- Choose the Paper Size from the drop-down.
- Click Apply.


Through Touch Screen
The process of changing paper size is even easier if you have touchscreen HP printers.
Once you load the papers in the paper tray, the printer will show the paper size and type.

You can keep the auto-detected settings (choose Maintain) or Change the paper size accordingly.