When using an external display, your PC is the primary device, numbered 1. But what if you want to switch the priority to Monitor 2?
Well, if your secondary monitor is bigger than your primary device, you might want to use it for playing games or watching movies. And, switching the monitor priority is also useful when extending your computer to a personal workstation.
Here, you will learn how to change or switch Monitor 1 to 2 and vice versa, using simple techniques on both Windows and Mac.
How to Switch Monitor 1 and 2 on Windows?
Almost every Windows version provides an in-built setting to switch the monitor priority. The steps involved are very easy to follow and understand. In this section, we will discuss how to switch Monitor 1 and 2 on Windows 11.
Change Authority From Monitor 1 to 2
Indeed, it’s much more convenient to work on an external monitor than on our laptops or desktops. Although you can duplicate your content directly, giving the second monitor absolute authority is better.
Connect Your PC to Secondary Monitor
Firstly, you need to get the necessary wires that help you connect to the monitor. Well, you could use an HDMI or even VGA cable, depending on your display device.
Furthermore, you can wirelessly connect your PC to an external display if it supports Miracast. You can refer to our other article to learn more about this.
If you’re planning to connect multiple monitors, you can use a multi-port HDMI Splitter. Interestingly, you can even link your PC to television for watching movies or playing games.
Navigate to Display Settings
The second step is to visit the Display Settings on your computer. Well, there are two ways to do this. Read the steps below to learn the first method:
- Go to Start Menu and search for Settings.
- Once you launch the Settings app, tap on System.
- Then, select Display.

Alternatively, there’s a direct method to launch the Display Settings. All you have to do is:
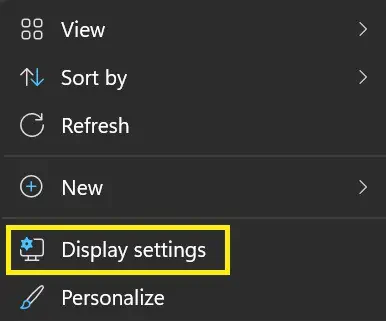
- Navigate to Desktop.
- Right-click anywhere on the screen.
- Now, choose Display Settings. This will take you to the same window as in the first method.

Choose the Right Display Mode
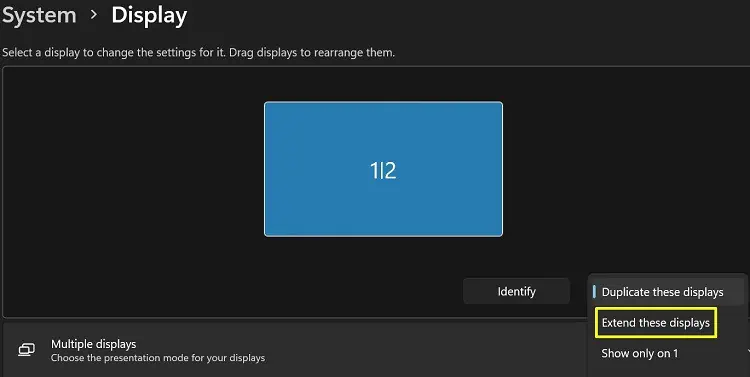
Windows provides four different types of display modes. After connecting your PC to an external monitor, the Duplicate these Displays is selected by default.
Here, you can see ½ on a small screen. This means that your screen is duplicated on your secondary device. So, it’s pretty clear you can’t change the monitor priority in this mode.
Therefore, you need to choose the right display mode using the following guide:
- Click on the selection drop down.
- Next, choose Extend these displays.

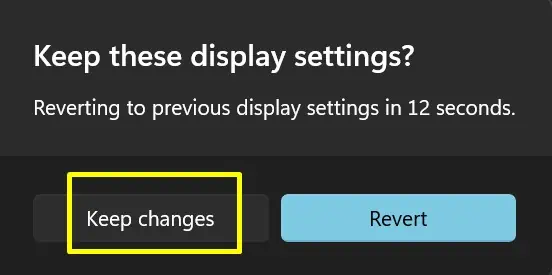
- Finally, press the Keep changes button to confirm your display mode.

Upon this selection, the small window showing ½ will now display two boxes. The first screen is numbered 1 while the second box is numbered 2.
By default, your primary monitor (laptop or desktop) is Monitor 1, and the external display is Monitor 2. To check this, you can click on the Identify button beside the selection dropdown.
If you add another monitor, it will be numbered 3, and so on. However, this depends on the port you connect to the external device.
Make Monitor 2 Your Main Display
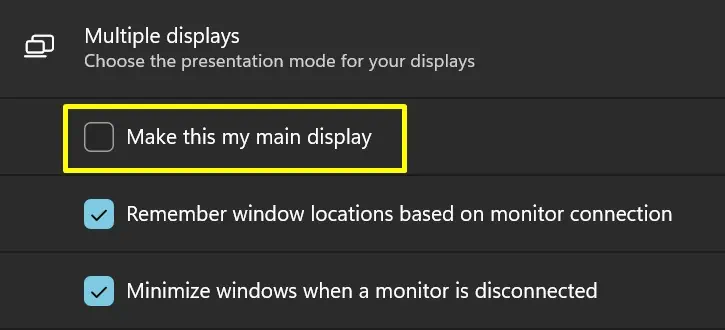
Before making Monitor 2 your main display, select Monitor 1. Now, expand the Multiple Displays tab.
You’ll see that the option Make this my main display can’t be altered here. This is because your PC’s monitor already has the priority.
But, your job is to give Monitor 2 the priority. Therefore, here’s what you can do:
- Choose the second screen from the display area.

- Then, click on the Multiple Displays tab to expand it, if needed.
- Next, tick the Make this my main display option.

Now, your monitor priority is switched to the second screen. Thus, all the actions you perform will display on Monitor 2.
To revert back, navigate to settings again. Then, click on the first screen. Now, you can mark the Make this my main display option. This will make your PC monitor primary again.
Allow Only Monitor 2 to Display Content
If you just provide priority to the second screen, your primary monitor will still stay open, displaying the desktop background. Instead, you can allow only the external monitor to show the content, putting your primary monitor to sleep:
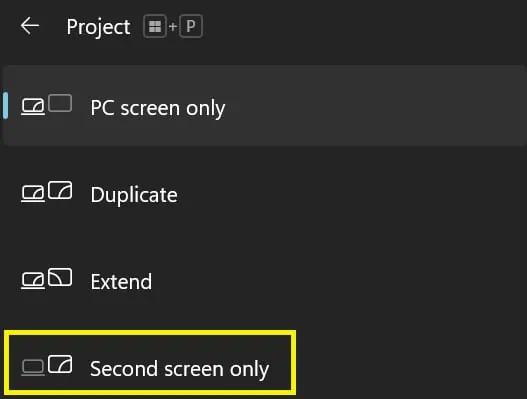
- From your taskbar icon pane, choose Project. Alternatively, you can directly press the Windows and P keys to open this window.

- Click on the Second Screen Only option. This will turn your Monitor 1 black and cast all the content on your external monitor.
If you want to revert the changes, you can select the PC Screen only.
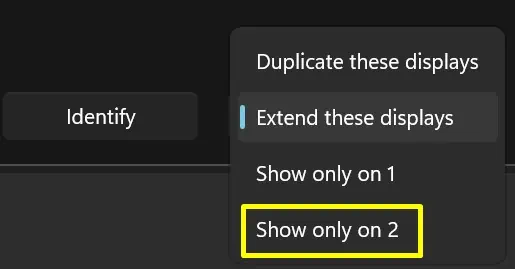
Well, you can do this using an alternative method too:
- Navigate to Settings > System > Display.
- In the selection drop-down, choose Show only 2. To allow your PC monitor to take over, select Show only 1.

Interestingly, you can even close your laptop lid and use an external display to save the battery. Read more about this in our other article.
How to Change Monitor 1 and 2 on macOS
Like Windows 11, the steps to change Monitor 1 and 2 on Mac are quite simple.
- Firstly, connect your PC to an external display wirelessly or using a wire.
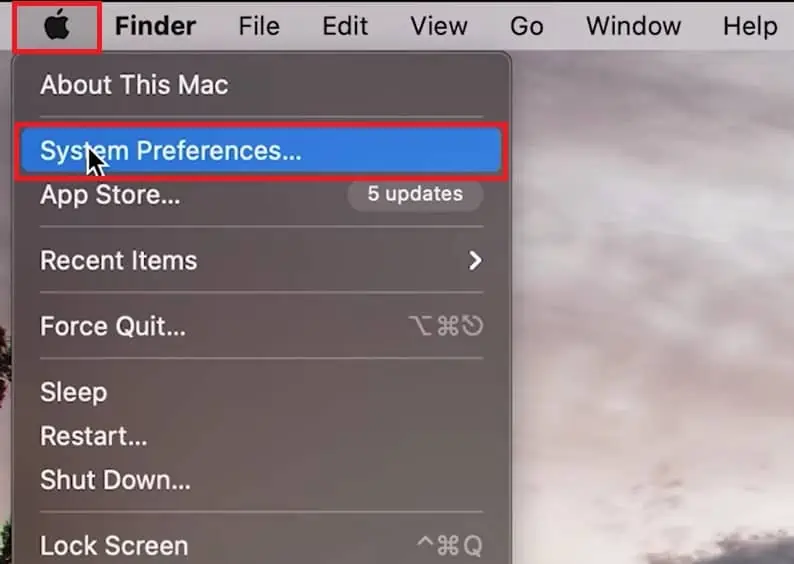
- Navigate to the Apple icon on your Mac menubar.
- Next, choose System Preferences. This will take you to your device settings.

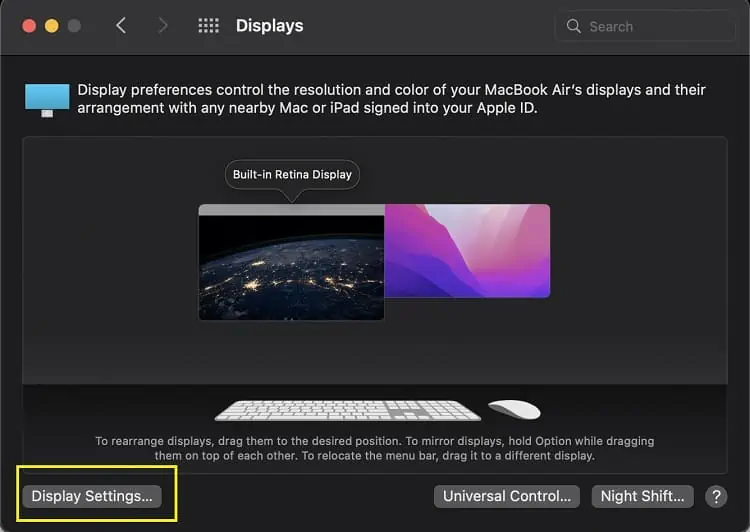
- Then, select Displays, which opens up a new dialogue box.
- Now, click on the Display Settings button from the bottom-left corner of the window.

- Navigate to Use as, and you’ll see the Main display option is selected.
- Choose Extended display. This will broadcast your content on the external monitor.

If you want to set the settings to default, go back to Use as and select Main display. Also, you can set the resolution and change the brightness from the same window.


