
If you use an HP inkjet printer and encounter low-quality printing issues, it may be time to clean the printhead. Printhead is responsible for holding the ink cartridges and spraying ink into the paper for printing. But when they get clogged, you may not get quality printouts from your printer.
You should consider cleaning the printheads if the printer prints blank pages, refuses to print colored documents, or generates streaky printouts. Similarly, if you have just changed the cartridges on your printer, cleaning the printhead helps remove the air bubbles on the printhead.
Using HP Printer Assistant Tool
The HP Printer Assistant tool comes integrated with the printer driver of your HP printer. You can simply launch it from the Control Panel and run the printhead cleaning process.
- First, insert a few papers in the input tray of your printer.

- Then, hit Windows and R keys on your keyboard.
- Type
control printersand press the Enter key. - Look for your HP printer under the Printers section and double-click it.
- Double-click HP Printer Assistant to open it.
- In the new window, click Maintain Your Printer tab.
- Go to the Device Services tab and choose Clean Cartridges.
- Follow the on-screen instructions to complete the head cleaning process.
- You will get a sample printout after the printer completes cleaning the printheads. You may run the printhead cleaning cycle again if it does not produce satisfactory results.


Using HP Smart
HP smart application has an inbuilt function to clean the printheads. You can download the HP Smart application on your computer and use it to clean the printheads.
- Put some papers in the input tray.
- Download and install HP Smart from the Microsoft Store.
- Launch the app.
- Once the app launches, click Printer Settings tab on the home screen.
- Tap Print Quality Tools.
- Select Clean Printheads.
- Your printer will now start cleaning the printheads. Wait till the printer completes the process and ejects a Print Quality Diagnostic page.
- You may again run the cleaning cycle if you are not satisfied with the print quality.


Sometimes, there might be ink-smearing issues after cleaning the printheads. If that’s the case, you can follow these steps to clean the ink smears.
- Click Printer Settings on the HP Smart’s home screen.
- Go to Advanced Settings.
- Choose Tools from the menu bar of the EWS screen.
- Expand the Utilities section and click Print Quality Toolbox.
- Click the Clean button next to the Clean Ink Smear option and follow the on-screen instructions to clean the ink smears on your printouts.


Using the Touch Screen Panel
If your HP printer has a touch panel, you can also navigate to the tools/Maintenance menu and run the head cleaning setup.
- Touch Setup menu on the home screen of your printer’s control panel.
- Look for the Tools option and tap it. In some printer models, you may see a Maintenance option.
- Choose Clean Printhead.
- It will start the cleaning process and ejects a print quality report page once the cleaning is completed.


Manually Cleaning the Printheads
In the majority of cases, the automatic head cleaning process works like a charm and helps printers achieve optimal print quality again. However, if you are still unsatisfied with the automatic cleaning results, you can manually clean the printheads.
We don’t recommend you clean the printheads on your own, as you could end up damaging the internals of the printer. Further, it also voids the warranty of your HP printer. But, you may proceed if your printer is out of warranty and you have some expertise in handling the printers.
Generally, printers have two kinds of printheads—a built-in printhead and a detachable printhead. Let’s see how to clean each of them in detail.
Cleaning the Built-in Printheads
The built-in printheads are normally found in HP Ink Tank series printers. They have two cartridges—tricolor and black. Each of them gets the ink from the ink tank and has a printhead on the bottom of the cartridge.
- Power off your printer and remove the power cables and USB cables from the respective ports.
- If the output tray is extended outside, push it inside the printer.
- Open the front panel access door of the printer.
- Open the cartridge door.
- You will see two cartridges in the carriage area.
- Now unscrew the screws that attach the upper door to the printer’s chassis.
- Hold the upper door of the printer.
- Gently move the cartridge casing to the middle of the paper path. You can not remove the cartridges without moving the casing to the center.
- Remove the upper lid of the cartridge where the ink tubes are attached.
- Press the locks on top of the cartridges and remove them from the casing. You will see printheads at the bottom of the cartridge.
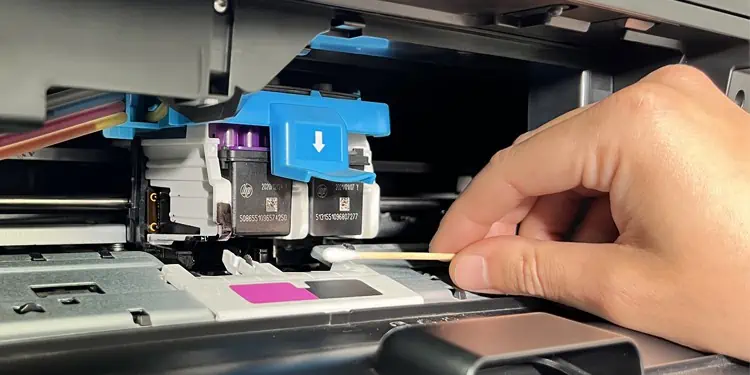
- Now take a lint-free cloth and spray some distilled water over it. Gently drag the printhead over the cloth to clean it. You may also use a Q-tip dipped in distilled water to clean it.
- Please refrain from touching the yellow-colored chips on the cartridges. The printer can fail to detect the cartridges later if anything gets in contact with the chips.
- After you complete the cleaning process, put the cartridge in the casing.
- Close the upper lid of the cartridge.
- Close the upper door and screw it.
- Close the cartridge door and front panel access door.
- Reconnect the power and USB cable. Try printing a document. You should not face print quality issues now.
Cleaning the Removable Printheads
You can find removable printheads mostly on the HP Officejet and HP Photosmart series printers. In such printers, the ink cartridges sit just above the printhead of your printer. You can remove the cartridges, then take out the printhead and clean it.
- Before starting the cleaning process, get a disposable plastic container, a few paper towels, hot distilled water, and a lint-free cloth.
- Place the container on a flat surface and stack the paper towels on the bottom of the container.
- Get some hot distilled water and pour it into the container such that the towels just immerse.
- Now open the cartridge access door of your printer and remove each of the cartridges. You can push the cartridge gently to unlock it from its position and remove it.
- Get another piece of paper towel and put all the cartridges over the towel by turning them upside down.
- Remove the printhead from the printer by pressing the latch.
- Spray some distilled water in the lint-free cloth and drag the printhead over the cloth to clean it.
- After that, dip the printhead into the container that you prepared earlier. Wait till the paper towels soak all the inks from the printhead. You can leave it for about 10 minutes.
- Remove the printhead from the container and place it on another paper towel by turning it upside down. Avoid using your hairdryer or compressed air to dry it faster.
- Put it back in the carriage.
- Put the cartridges back properly into their respective slots.
- Close the access door.
