
Whether you are building a new PC or just trying to upgrade the GPU, the installation process is fairly simple.
First, ensure that the GPU is compatible with your case. Once that’s done, all you need is a couple of screws and a screwdriver.
Now, choose a PCI-e slot, remove slot brackets, insert the GPU, and screw it in place.
You also need to supply power to it and connect the monitor for display. Now, for the OS to use the GPU, you will need to install a graphics driver as well.
To give you a step-by-step guide, I have installed MSI Radeon RX 570 GPU on my ASUS ROG B450 motherboard. I will share my experiences from what I learned to make it easier for you.
Check GPU Compatibility
You first need to make sure that the GPU is compatible with your motherboard and your case. There are a few things you need to keep in mind.
- To start things off, check the GPU’s physical dimensions. High-end GPUs will have three fans and a larger heatsink. So, they might not fit into smaller PC cases.

- Make sure that the case has enough slot brackets for the GPU. Depending on the graphics card, it may have a single, dual, or triple slot. For example, my MSI’s Radeon RX 570 covers two slots.
- Depending on the GPU, it will require a certain amount of power to operate. Make sure that your PSU can supply enough power. GPU manufacturers will have information about the GPU’s power requirement.


Also, ensure that you match the motherboard’s and the GPU’s PCIe version. Although PCIe supports backward compatibility, connecting two different PCIe versions means it runs at a speed supported by a lower version.
Say your motherboard has two PCIe slots, one is PCIe 3.0 and another is PCIe 2.0. If your GPU has a PCIe 3.0 connector, you need to connect it to PCIe 3.0 on your motherboard.
Note: If you are using a CPU without an integrated GPU, you need a discrete GPU to run the PC. Without it, the VGA lights on the motherboard will lit, indicating a POST error.
Before You Connect

If you are building a new PC, it is best that you insert the graphics card at the end. Here, I have considered that you already have installed the CPU, storage drive, memory stick, and the appropriate cooler.
I suggest you only move on to the graphics card after you have installed the motherboard into the case.
This way, you can determine which PCI-e slot bracket you need to remove in order to insert the GPU.
If you are installing a graphics card into the existing PC,
- Turn off the system and remove the power cord from a wall outlet.
- Press the power button four to five times to discharge the capacitors.
- Remove all the screws that hold the side panel and take it out.


Now that you have access to the motherboard, you can continue with locating the PCIe slot.
But, in case you are upgrading your graphics card, you need to take out the previous one first. To do so,
First, remove the side panel. Then, follow the steps below.
- Unplug the PCIe power cable that connects to the GPU.
- Now, you need to remove any screws that connect the GPU to the rear brackets of the PC case.
- Check the PCIe slot. There should be a lock that secures the GPU connection to the motherboard. Press this lock.
- Now, gently take the GPU out of the PC case.


Locate and Choose a PCIe Slot

The GPU connects to the longest PCI-e (Peripheral Component Interconnect Express) slots on your motherboard.
Your board may have one or multiple x16 PCI-e slots. If it has more than a single slot, you need to choose the correct one.
For EATX, ATX, and Micro-ATX motherboards with multiple PCI-e slots, choose one that uses 16 lanes. Other x16 slots may use 8 lanes. You can check your motherboard’s user manual to see which lane provides the highest speed.

The general rule of thumb would use the first/top PCI-e slot or the one closest to the CPU.
But sometimes, the first or the top slot may not be available. This is exactly what happened in my previous build. I had a bulky CPU cooler, which blocked the top PCIe slot. So, I had to use the remaining one for my GPU.
The second PCIe slot was slower as it only used 8 lanes as opposed to 16. And therefore it bottlenecked my entire GPU. To use the recommended PCIe slot, I had to replace the cooler.
Remove PCIe Slot Cover
Now, you need to take out the corresponding PCIe slot bracket from the case. This metal bracket prevents you from inserting the GPU into your motherboard.
Align the GPU with a designated PCIe slot and mark the number of PCIe covers that you need to remove.
Usually, you need to remove the first and second, or second and third brackets. In my case, it was the second and third slot covers.
You might also need to remove three covers if you have a GPU with a thickness of 61mm.

Depending on the PC case, you may even see a screw connecting the bracket. If so, remove the screw to take the bracket out.
Press the bracket from the inside of the case using the opposite end of the screw. The bracket should come right out.

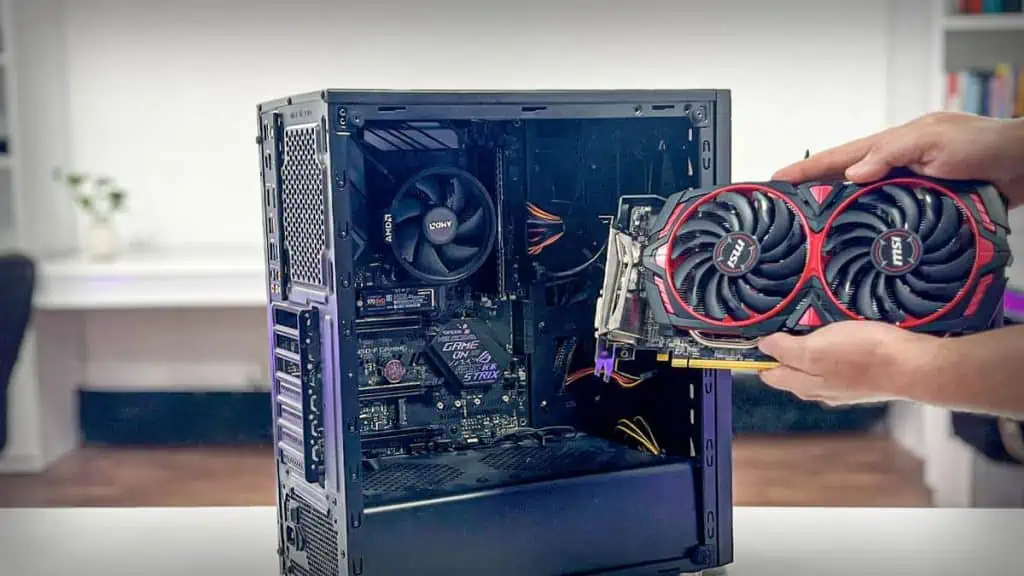
Insert the GPU
Before we begin, make sure that you remove any plastic cover from the GPU connectors. New GPUs may have this cover to protect the connector pins.
- The x16 PCIe slot has a lock on one side. Push this lock. The slot is now ready.
- Line up the GPU with the PCIe slot. Make sure that the notches on both parts align with each other.
- Make sure that the IO ports on the GPU face the back side of the case.
- Aligning the GPU with the PCIe slot might be difficult, especially when the GPU fan and heatsink are bulky. In that case, I suggest you align them from the back side of the GPU as shown in the figure.
- Once aligned, insert the GPU in the PCIe slot.
- Gently press the top part of the GPU until you hear a click. This means that the GPU is locked in.


Secure the GPU

Now, you need to make sure that it does not wiggle.
You need to screw the backside of the GPU to the PC case. The PC case will have all the necessary screws to secure the GPU. If you do not have any screws, check if your motherboard has any screws that could work.
The PCIe slot cover that you removed might also have a screw. In that case, you can use it to secure the GPU.

Depending on the GPU, you might need one or more screws to secure the GPU.
If the slot cover was connected with a separate metal plate, make sure that you insert it as well.
If you do not have any screws, you can get them in a local computer shop.
Connect PCIe Power Cable
Now it’s time to power the GPU. Your GPU may or may not require a separate power source.
Graphics cards, like the GTX 1050, or GTX 1650, are some of them. These GPUs take power directly from the motherboard. If your GPU does not have a PCIe connector, you can skip this step.
For me, the MSI RX 570 required an 8-pin power connector. So, I took the 8-pin PCIe power connector and attached it to the GPU.

Depending on the GPU it will require a 6, 8(6+2), 12, or even 16-pin power connector.
Top-tier GPUs, like the 6800 XT, require a 2×8-pin power connector while the 3060 requires a 12-pin connector.
Take the necessary PCIe cable from the PSU and connect it to the GPU. If you are having trouble identifying the cable, check for a label or writing that says PCIe. Once you find the power connector, plug it into the GPU port.
You can only insert the PSU cable one way. So if you cannot insert it in the first go, reverse the connector and try again.
In case you are using a fully modular power supply, connect it to the PSU’s PCIe connector as well.
Connect Display Device
This is where most users get things wrong. They connect the display device to the motherboard’s I/O panel.
If you have a graphics card connected to the PC, you should always connect the display device to the graphics card. Connecting to the motherboard allows the system to use integrated graphics instead of the dedicated one that you just installed.

The GPU will have multiple display ports. Using this, you can also connect multiple monitors as well.
Congratulations! You now have successfully installed your graphics card.
Install Required Drivers
You likely have an AMD, NVIDIA, or Intel’s Arc GPU. To use the device efficiently, you need to install its respective drivers.
If you are replacing or upgrading your current GPU, I recommend that you uninstall the previous GPU driver. Multiple GPU drivers in the same system could cause internal hardware conflicts, resulting in the GPU crashing.
- Head over to AMD, Intel, or NVIDIA’s official website.
- Click on the search icon and search for your graphics card.
- Download the driver file. For AMD, you can simply download Adrenaline Software.
- Download and run the driver file as admin to install the graphics driver.
- Restart your PC after the installation completes.
- Once the system boots, open Device Manager and check the display driver. Here, you should see your graphics driver.


GPU Doesn’t Work After Installation? Here’s What to Do
The system will not POST if it does not detect the GPU. So, I recommend checking for POST codes, LED lights, or beep codes depending on your motherboard.
If it indicates any issues with the GPU here are a few things you can try.
- First, make sure that the display device is connected to the GPU and not the motherboard. The system won’t boot when you connect the monitor to the motherboard if the CPU does not have an iGPU.
- If the system POSTs (Power On Self Tests) but the monitor displays a black screen, the fault is likely with the display cables or ports. In that case, I recommend changing the display ports and then the cables.
- Had you checked the GPU power that I discussed earlier? If it’s not receiving enough power, you might want to upgrade your PSU.
- A damaged PCIe slot could also stop the motherboard from detecting the GPU. Try installing the GPU in another PCIe slot if available.