If you no longer need VMware, you might as well uninstall it to free up the space it takes. Additionally, you may need to uninstall it if you encounter any issues while using the app.
This process is very quick to perform. However, due to issues like power failure or conflicts from other applications, such as antivirus, you may not be able to uninstall the VMware.
Uninstalling VMware on Windows
The installation folder of older VMware versions included an uninstall.exe file that you could run to uninstall it. However, for the latest versions, you need to use the app settings or programs and features. You can also use a PowerShell cmdlet to uninstall this application.
If you can’t completely uninstall the program using these methods, you need to manually remove all its files and registry entries.
Using Control Panel
The traditional way of uninstalling an application is through the Programs and Features tool included in the Control Panel. Here’s how you can use it to uninstall VMware:
- Open Run by pressing Win + R.
- Type
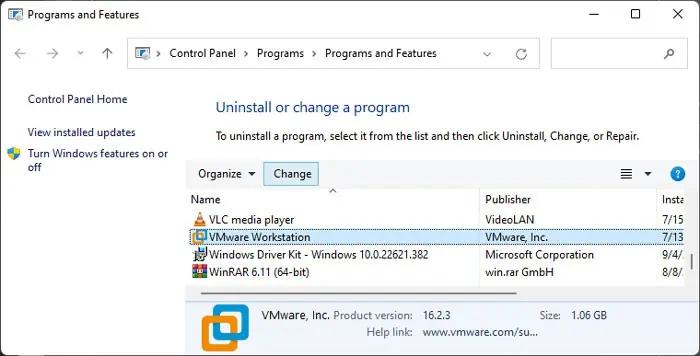
appwiz.cpland press Enter to open the Control Panel’s Programs and Features page. - Search for and select VMware Workstation or VMware Player and click on Change.

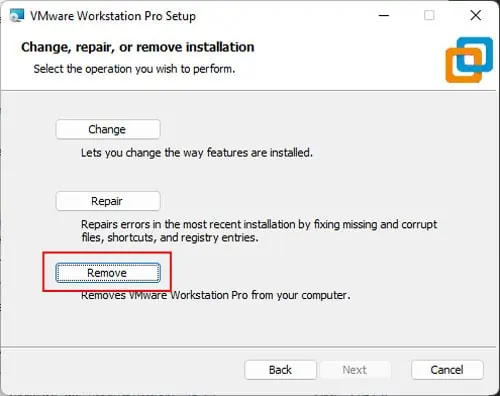
- Select Next and then Remove.

- Check the option you need to save and click Next.
Through App Settings
Windows 8 introduced the Settings app as an alternative for the Control Panel. You can use its App Settings to uninstall VMware on Windows 10 and later versions. To do so,
- Open Run.
- Enter
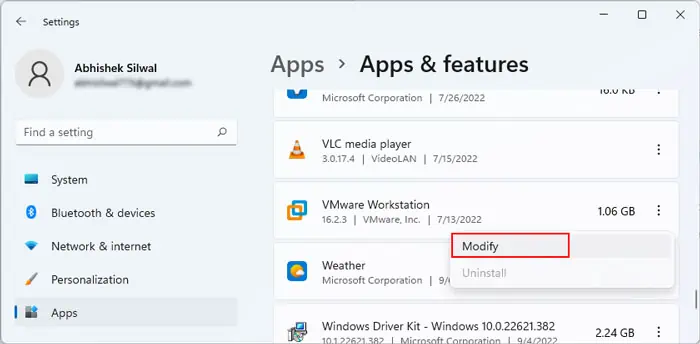
ms-settings:appsfeaturesto open the App Settings. - Scroll down and search for VMware workstation or VMware Player.
- Select on it or click on the triple-dot icon next to it and choose Modify. You will be able to select Uninstall on older versions.

- Select Next and then Remove.
- Check the option you need to save and click Next.
With Windows PowerShell
You can also use the Uninstall-Package PowerShell cmdlet to uninstall your apps. Here’s how you can use it to remove VMware:
- Open Run.
- Type
powershelland press Ctrl + Shift + Enter to open the Elevated Windows PowerShell. - Enter the following command:
Get-Package -Name "VMware Workstation*" | Uninstall-Package
Replace Workstation with Player if you want to remove this app instead.
- Type
Yand press Enter if prompted.
Directly Using the Uninstaller/Modify Script
It is also possible to directly run a shortcut for the uninstaller wizard for VMware. First, you need to figure out what the script is through the Registry Editor and then run it. Here are the necessary steps for the complete process:
- Open Run and enter
regeditto open the Registry Editor. - Navigate to
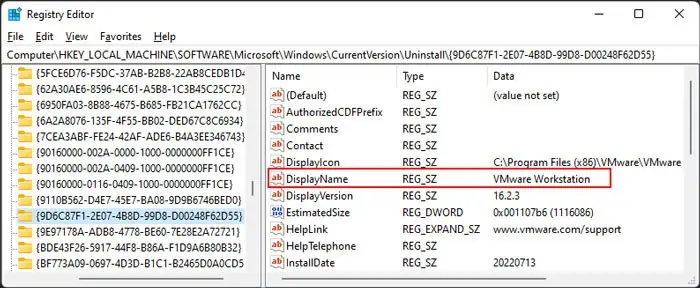
Computer\HKEY_LOCAL_MACHINE\SOFTWARE\Microsoft\Windows\CurrentVersion\Uninstall\{9D6C87F1-2E07-4B8D-99D8-D00248F62D55} - This key is for VMware Workstation 16.x. Other versions may use a separate key. To get there,
- Go to
Computer\HKEY_LOCAL_MACHINE\SOFTWARE\Microsoft\Windows\CurrentVersion\Uninstall\ - Select each key inside Uninstall and check the value of the DisplayName entry. It should show VMware Workstation or VMware Player.

- Go to
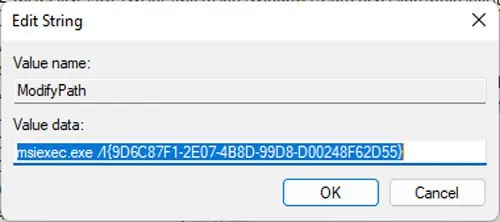
- Double-click on ModifyPath and copy its Value data. For older versions, you need to copy the value of UninstallString.

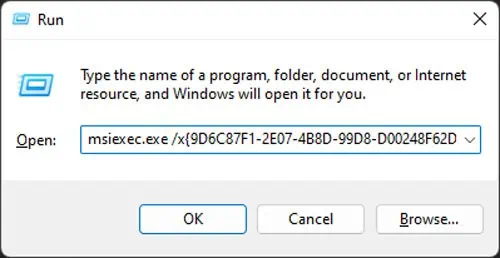
- Open Run and paste the ModifyPath value.
- Replace /l with /x, then press Enter. For example, if the script in ModifyPath is
msiexec.exe /l{9D6C87F1-2E07-4B8D-99D8-D00248F62D55}, you need to entermsiexec.exe /x{9D6C87F1-2E07-4B8D-99D8-D00248F62D55}
- Confirm your choice and follow the onscreen instructions.
Manually Remove VMware Files
If the above uninstallation processes fail, you won’t be able to uninstall the application properly. Then, you also can’t install VMware again on your system due to the persisting files.
In such cases, you need to manually remove the VMware files to clean up the incomplete uninstallation and properly remove the app from your PC.
First, log in with an administrator account and temporarily disable your antivirus and firewall. Then, follow the steps below one by one to manually remove VMware from your system:
Stop VMware Services
- Open Run and enter
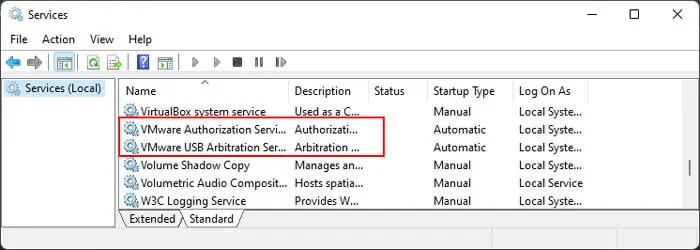
services.mscto open Services app. - Search for all services starting with VMware.

- Right-click on them and select Stop.
Uninstall VMware Devices
- Open Run and enter
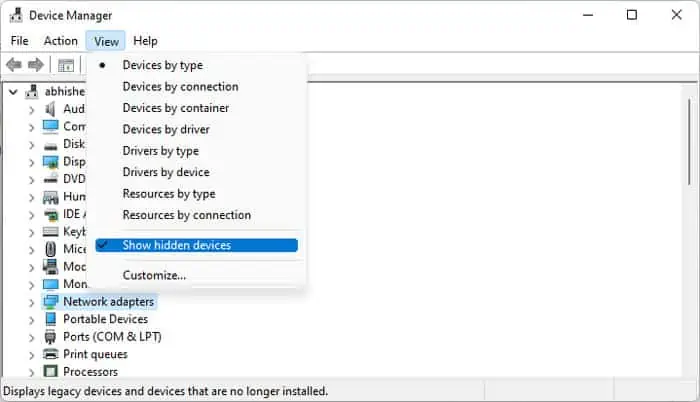
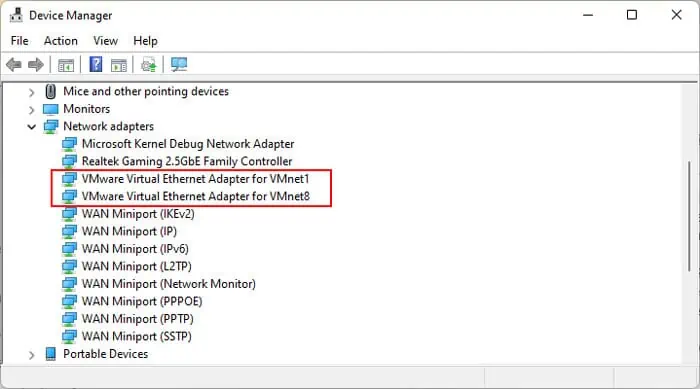
devmgmt.mscto open the Device Manager. - Select View > Show hidden devices.

- Expand Network Adapters.
- Right-click on the devices starting with VMware and select Uninstall device > Uninstall.

- Then, open Run and enter
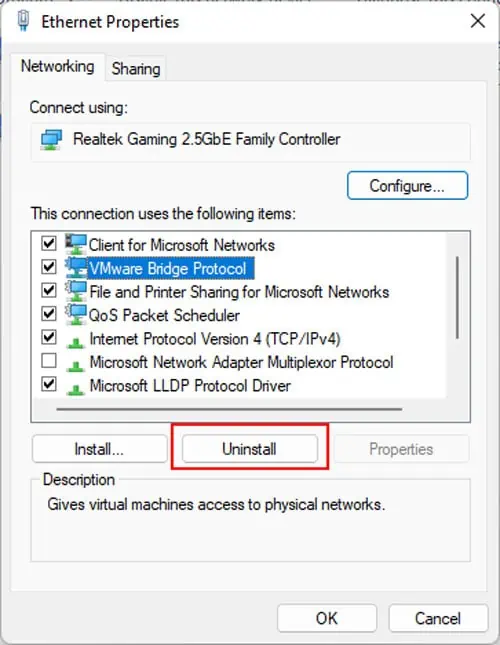
ncpa.cplto open Network Connections. - Right-click on a network and select Properties.
- Select VMware Bridge Protocol and click Uninstall.

- Click OK after uninstalling it. Then, do the same for other networks.
Delete VMware Folders and Files
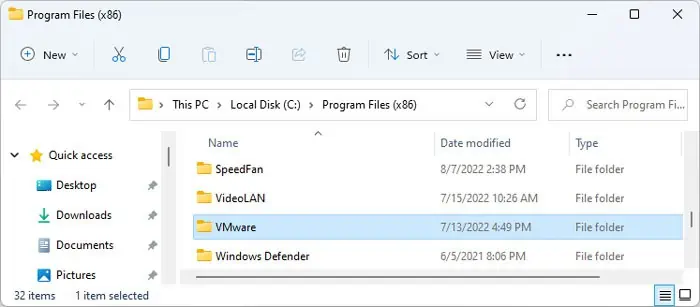
- Press Win + E to open File Explorer.
- Navigate to
C:\Program Files\orC:\Program Files(X86)\and delete the folder VMware.
- Select Yes to provide admin permissions.
- Now, open Run and enter
%programdata% - On the ProgramData folder, delete VMware.
- Then, open Run and enter
%windir%\system32to navigate to this directory. - Delete the following files if available:
vmnat.exevmnetbridge.exeVMNetDHCP.exevmnetdhcp.leasesvmxw2ksetup.dllvnetprobe.exevnetprobelib.dllvnetinst.dllvnetlib.dllvnetlib.exe
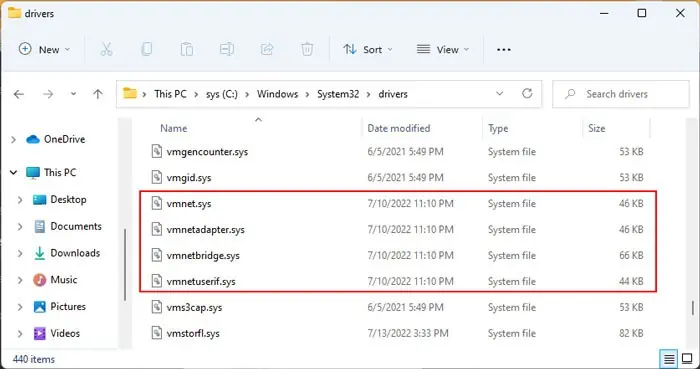
- Then open the drivers folder inside System32 and delete these files if present:
vmnet.sysvmnetx.sysVMparport.sysvmx86.sysvmnetadapter.sysvmnetbridge.sysvmnetuserif.syshcmon.sysvmusb.sys
Delete VMware Users and Groups
- Open Run and enter
lusrmgr.mscto open Local Users and Groups Manager. - Double-click on Users and look for __vmware_user__.
- If it’s there, right-click on it and select Delete > Yes.
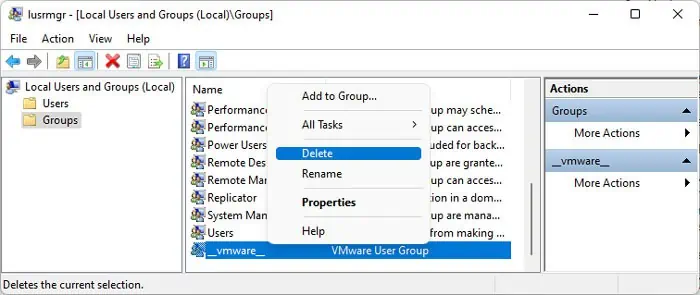
- Then, go to Groups and look for __vmware__.
- Use a similar way to delete it as well.

Delete VMware Registries
- Open the Registry Editor
- Navigate to
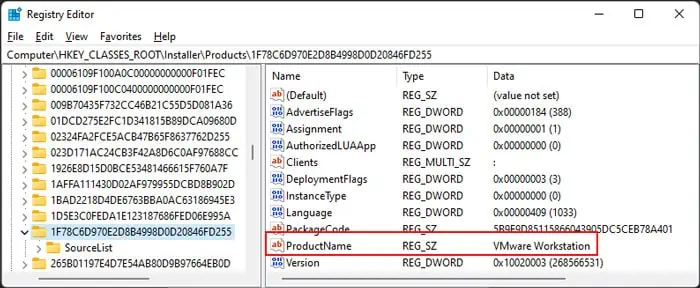
Computer\HKEY_CLASSES_ROOT\Installer\Products\and select the first key within Products. - Check its Product Name.
- If it’s not VMware Workstation or Player, press the down arrow key to check for the next key inside Products.

- Use steps 3 and 4 to find out the key for VMware and note it down. The key is the folder inside Products.
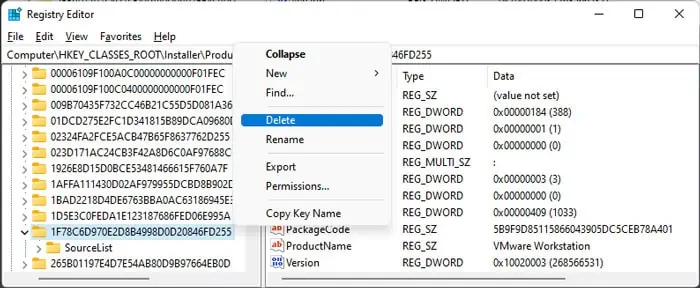
- Right-click on this key and select Delete > Yes to remove it.

- Then, navigate to
Computer\HKEY_CLASSES_ROOT\Installer\Features\<copied key name>and delete this key as well. For example, the key may beComputer\HKEY_CLASSES_ROOT\Installer\Features\1F78C6D970E2D8B4998D0D20846FD255 - Now, delete the following keys as well:
HKEY_LOCAL_MACHINE\SOFTWARE\Classes\Installer\Features\<copied key name>HKEY_LOCAL_MACHINE\SOFTWARE\Classes\Installer\Products\<copied key name>HKEY_LOCAL_MACHINE\SOFTWARE\Microsoft\Windows\CurrentVersion\Installer\UserData\S-1-5-18\Products\<copied key name>HKEY_CLASSES_ROOT\Installer\UpgradeCodes\3F935F414A4C79542AD9C8D157A3CC39HKEY_LOCAL_MACHINE\SOFTWARE\Wow6432Node\VMware, Inc.\VMware WorkstationHKEY_LOCAL_MACHINE\SOFTWARE\Classes\Applications\vmware.exeHKEY_LOCAL_MACHINE\SOFTWARE\VMware, Inc.
- Then, navigate to
Computer\HKEY_LOCAL_MACHINE\SOFTWARE\Microsoft\Windows\CurrentVersion\Uninstall\ - Select each key inside Uninstall and check the value of the DisplayName entry.

- If it shows VMware Workstation or VMware Player, delete the key altogether.
Uninstalling VMware on Linux
On a Command line-based system like Linux, you can easily use some commands to uninstall VMware on your computer.
Here, we use the commands for the Ubuntu Linux system. Other distros use different commands, so you need to search for and use those accordingly.
Using the Uninstaller
The default way of uninstalling VMware on Linux is by using the uninstaller script. Here’s how you can do so:
- Open the Terminal.
- Enter the following command depending on whether you want to remove VMware Workstation or VMware Player:
sudo vmware-installer -u vmware-playersudo vmware-installer -u vmware-workstation
- You may also need to use the full path for vmware-installer, i.e.,
/usr/bin/vmware-installer
Manually Uninstalling VMware
If uninstalling VMware using the uninstaller fails, you need to manually remove all of its files. To do so,
- Open the Terminal.
- Enter the command below to stop VMware services and processes:
/etc/init.d/vmware stop
- Move the VMware libraries to /tmp using the commands:
uname -r(to check the kernel version)cd /lib/modules/<kernel version>/misc(replace <kernel version> with your kernel version)mv vm* /tmp
- Then, you need to unload the kernel modules,
rmmod vmnet.ormmod vmmon.ormmod vmci.ormmod vmblock.ormmod vmppuser.o
- Now, remove the VMware logon scripts using the commands:
rm /etc/rc2.d/*vmware*rm /etc/rc3.d/*vmware*rm /etc/rc5.d/*vmware*rm /etc/rc6.d/*vmware*
- After that, you can remove the VMware files and directories (if available),
rm -rf /etc/vmware*rm /usr/bin/vmware-usbarbitratorrm /usr/bin/vmnet*rm -r /usr/lib/vmware*rm -r /usr/share/doc/vmware*

