
The safe motherboard temperature is anywhere from 20°C to 80°C. However, this completely depends on your cooling setup, the motherboard’s build quality, ambient temperature, and airflow/ventilation.
Unlike CPUs and GPUs, there’s no one standard value when measuring motherboard temperature. The scattered sensors across the PCB are the ones that detect how hot it is (in different locations).
In this guide, I will share my test results to help you get an idea of the safe temperature limits. Also, I will provide handy tips on how to check the motherboard temperature and ways to prevent/solve overheating issues.
But before anything else, let’s quickly learn what Motherboard temperature sensors are.
Motherboard Temperature Sensors – A Brief Overview

Every computer component draws a certain amount of power to function. So, it’s pretty obvious for heat to be generated throughout the motherboard.
The more these components operate, the greater will be the heat generation. But note that the temperature isn’t constant everywhere.
The hottest regions of the motherboard are where the basic components exist (mainly the processor and graphics card).
Modern boards are equipped with several sensors that help us get the reading of every location. These are usually scattered in and around the major sections – CPU socket, PCIe/DRAM slots, VRM (Voltage Regulatory Module), CMOS, chipset, etc.
Well, the exact number and where they are soldered completely depends on how the PCB is designed. Meaning, one motherboard can have six to even ten sensors while the other may include just two or three!
How to Monitor Motherboard Temperature
My go-to method to check temperature is using a hardware monitoring utility. Apps like HWMonitor, AIDA64, and HWiNFO64 display all the sensors on your board with their live readings.
You can even utilize BIOS Utility, an OEM tool, or an Infrared thermometer to do the needful. Let’s discuss each of them in detail.
Through Hardware Monitoring Tools
You can find a plethora of hardware-monitoring utilities that help measure the temperature of different components, including the motherboard. My personal favorites are HWMonitor and HWiNFO64.

Take a peek at the comparison screenshot above. Look at the Temperatures section under your system model/manufacturer.
Don’t get confused with the CPU and Socket labels here. These are simply the sensors on the motherboard.
Your processor’s actual temperature is usually 1 to 2 degrees higher. To verify this, navigate to your CPU section and look for package and core readings.
When checking the motherboard temperature on my MSI MAG B550M MORTAR motherboard, HWiFO64 indicates an additional sensor (T15).
Turns out this one isn’t quite relevant and may even display wrong values (as stated by an HWiFO64 staff). The other sensors are pretty much self-explanatory.
However, the nomenclature can be different on other motherboard models. According to HWMonitor, here are the temperature sensors on my ASUS PRIME B450 PLUS:

As you can see, TMPIN0, TMPIN1, and TMPIN2 aren’t indicated by a specific label. So, we do not know what they correspond to.
A simple trick should work here. As I mentioned earlier, the CPU and GPU are the hottest ones. Keeping that in mind, you can make a guess where the sensors could be located.
In the case above, TMPIN0 indicates sensors close to the CPU. TMPIN1 is the general system/motherboard sensor. And, TMPIN2 is the one near the PCIe (with no graphics card installed) and chipset.
This could be totally different on yours. In fact, you may even come across different names. For example, TZ00 and TZ01 are on most laptops. Where one sensor is near the CPU socket and the other close to the chipset or MOSFETs.

It would have been easier if motherboards included the sensors in the manual. Sadly, that’s not the case (as far as I’ve tested on multiple boards of MSI and ASUS).
Advanced users with the right knowledge may physically inspect the PCB markings.
From Motherboard OEM Application
While third-party tools are the preferred choice among most professionals, you can still stick with your manufacturer’s recommended application.
I’ve listed down the utilities for the most popular brands. You may download it from your product’s support page online.
| Motherboard Brand | Utility |
| MSI | MSI Center |
| ASUS | AI Suite 3 |
| Gigabyte | System Information Viewer (requires the installation of App Center) |
| ASRock | ASRock Motherboard Utility (differs for every model) |
Some of the aforementioned tools might only show one motherboard reading. If so, note that it’s only displaying the information related to one sensor. You need to keep an eye on other values too.

Now, let’s see how accurate a motherboard utility can be. For demonstration, I launched both HWMonitor and MSI Center. As shown above, the values remain almost similar (so, you can expect accurate readings)!
Via BIOS
While the UEFI/BIOS utility includes a hardware monitoring section, you’re not blessed with complete sensor detection. Meaning, there’s only one field showcasing the motherboard’s temperature.
In most models, this is the reading of the general sensor. Exactly the one that we saw earlier as System temperature in HWMonitor.

Some even claim that this is an average value. It’s probably true as most manufacturers use their specific algorithm to display a single temperature.
Even so, I recommend utilizing the aforementioned software-based utilities to get a detailed understanding of your overall system temperature.
In BIOS, I’m pretty sure the indicated temperature sticks somewhere from 20 to 50°C. In case the reading is going higher than expected, it’s definitely a matter of concern. But this also depends on the cooling setup and ambient temperature.
Well, the system sensors are usually away from the CPU socket and that part of the motherboard shouldn’t heat up so much. In such scenarios, your PC might even fail to POST.
Use Infrared Thermometer [Optional]
This isn’t the best way to measure motherboard temperature as the values aren’t accurate (usually low). In fact, I wouldn’t recommend going for it if the hardware monitoring application is already working fine.
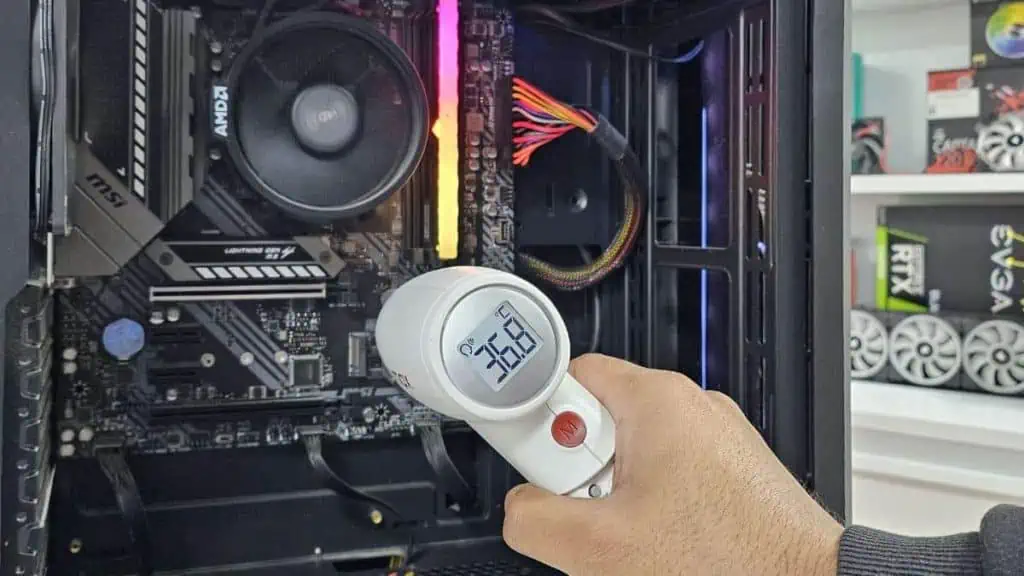
However, Infrared thermometers can come in handy if your motherboard’s temperature sensors are showing inaccurate readings. On the safety side, make sure you’re properly grounded and don’t touch the running motherboard.

The above image is a clear demonstration of how to get the reading. We have used the FLIR ONE Pro Thermal Imaging Camera on MSI MAG B550M MORTAR. And here’s how its readings compare with HWMonitor:
| Motherboard Location | Temperature recorded by FLIR | Temperature shown in HWMonitor |
| CPU Fans | 18.9°C | CPU Sensor: 27°C |
| Socket: 20.4°C | ||
| CPU Package: 28°C | ||
| Chipset | 27.4°C | 27.7°C |
| VRM | 23.2°C | MOSFET: 29°C |
| CMOS | 24.2°C | |
| PCIe (with no Graphics Card installed) | 21.8°C | 23°C |
As you can see, the temperatures aren’t accurate, especially in the case of the CPU. And the same happens if you utilize a dedicated GPU instead of an integrated.
The thing is – hardware monitoring apps show us the reading of sensors that lie beneath the heatsink. Using an IR thermometer means we are measuring the external temperature. It won’t be possible to get an accurate temperature this way.
Apart from the main components, you’ll only notice a small temperature difference with the others. So, no worries! This way, you’ll still be aware of what’s happening with your motherboard temperature.
Extra Tip: Some motherboards offer a dedicated 2-pin temperature sensor header. You can connect thermistor cables that keep track of the internal temperature. Check your user manual and look for EC_Temp, T_Sensor, and similar indications to confirm whether your motherboard supports it.
Safe Operating Temperature for Motherboards
By now, you know there’s no one standard motherboard temperature. So, to know the safe limits, you need to understand the ideal values for every sensor.
Since the CPU and GPU are the hottest components, the sensors near them will show high readings. Just know that their safe operating limit is between 20 and 80 degrees.
When running intense applications, it’s fine for the temperatures to reach 90 to 95°C. In case the CPU and PCIe sensors hit above 100°C, the components start to thermal throttle. So, your PC slows down and may even crash.
The lower the better, right? Well, not exactly! The motherboard’s overall temperature should be at least higher than the ambient temperature.
If it goes below that, water droplets may form after the moisture in the air condenses, which is even worse than overheating.
So, the general sensor (Sys/Motherboard) should be reading anywhere from 20 to 50 degrees. But this depends on your surroundings too. Say the ambient temperature is 30 degrees. In that case, 60 to even 70°C won’t be considered bad.
Like the Sys sensors, the MOSFET and chipset temperature generally read between 20 to 50°C (or a maximum of 60 to 70). Well, that was the case with me. Yours could be different!
To understand this even better, I tested temperatures on a few mid-range setups. And on three different test cases – after the PC starts, when performing web-based tasks, and when stress testing the CPU. The ambient temperature was about 20°C with stock coolers (the number of case fans varied).


Results and Findings:
- On every setup, the CPU sensor registered a slightly higher temperature at startup than during normal usage.
- When the PCIe slots were empty, the relevant sensors were between 30 to 40 degrees. With a discrete GPU installed, the motherboard heated up, as the GPU temp reached the levels equivalent to the processor.
- Even an additional case fan in one setup couldn’t outperform the other with none. Meaning, the motherboard quality and other factors (like overclocking RAM/processor) came into play!
- The other motherboard temperature sensors (SYS, MOS, Chipset, Socket, and TMPIN1) didn’t surpass 45 degrees in any test on any setup.
- Ambient temperature, cooling, airflow, and motherboard quality all played a vital role in maintaining the overall system temperature.
From here, we can confirm that only the CPU and GPU sensors can reach alarming temperatures. If you see high readings in the chipset, MOSFET, or even the general motherboard sensor, there are four possible cases:
- The sensor is showing inaccurate readings. Meaning, it could be at fault.
- The application you’re using is faulty. Better to verify this using another utility.
- The motherboard is indeed overheating. So, you’ll need to check the airflow, and thermal compounds, and try other possible solutions discussed below.
- It’s a sign that your motherboard is failing or the relevant component is going bad.
Motherboard Overheating? Here’s How to Lower Its Temperature
A laggy system, loud fans, and frequent crashes are possible signs that your motherboard is overheating. The major reasons include hot surrounding temperature, excessive dust buildup, failing components/circuitry, etc.
We have a detailed guide on fixing motherboard overheating issues. Here are the summarized solutions and prevention measures to help lower the temperature:
- First, verify which part of the motherboard is showing a critical temperature.
- In case all the sensors read high temp, it’s likely due to poor airflow and ventilation:

- First, move your PC to an ideal location and keep the ambient temperature cool as well. For example, most PCs at our office are kept in air-conditioned rooms. So, overheating motherboard has never been a worry factor to us.
- Consider installing more case fans. While at it, make sure the intake and exhaust fans are balanced out. All the hot air built up inside the casing should be driven out to ensure the system remains cool at all times.
- Try increasing the fan speed for optimal cooling. Follow my guide to learn the basics of fan speed control.
- If only one section measures a high temperature, you might want to reseat the component and reapply the thermal compound:
- CPU and Socket sensors: Try cleaning the CPU fans, reapplying the thermal paste, and reseating the cooler. If these don’t help, you might consider upgrading to a better air or AIO setup.
- GPU/PCIE sensors: Clean the relevant fans/PCIe slot and reseat the graphic card. You can even reapply thermal paste on your GPU.
- Chipset sensors: It’s probably time to replace the thermal pads. Make sure you choose the right thickness. If there’s a dedicated fan (as with our TRX40 AORUS MASTER), clean it as well.
- Besides, I also recommend lowering your CPU and RAM OC settings. You can even try undervolting the processor. This should help decrease the temperature on the CPU, socket, and even the MOSFETs.
- If the sensors still show high readings, I recommend thoroughly cleaning your motherboard. In fact, it’s best to dust off particles from the entire PC.


Even a failing PSU can indicate numerous problems in your system. There’s a high chance it could have caused your components to overheat.
Note that high temperature even indicates that your motherboard is showing signs of failure. But if it’s a new board, I highly recommend contacting your vendor. DOA (Dead on Arrival) is a common issue and if you think that’s the case, you’ll need to replace the mainboard.