While most PC components that generate heat, like CPUs and GPUs, use their separate coolers, these are not enough at all. You need additional case fans to pull cool air inside the PC and take the hot air out of it.
Modern PC cases provide a number of housings or fan slots to place such fans. You can install the fans in these positions to get the optimum cooling effect.
To install case fans on your PC, open the necessary panels, align the fans to the respective slots, fasten them with screws, and connect their fan cables. Before that, it’s better you find the right type of fan and identify the inlet/exhaust sides.
In this comprehensive guide, I’ll go through all these things in detail to help you install all types of case fans in any PC case.
Get the Case Fans Ready

Before installing case fans on your PC, you need to prepare a suitable number of intake and exhaust case fans. Otherwise, the CPU may start overheating, especially if you overclock it.
Also, if you have not bought the case fans yet and are undecided on what type to buy, I recommend checking out my articles on PWM vs DC fans and 120mm vs 140mm fans to get a better idea.
Open PC Case
Now that you have finalized the number, types, and position of the fans, let’s start with opening the PC case by removing the panels.
- Bring your PC case to an open and clean workspace.
- Unfasten the screws on the left side panel and slide it out or pull it off.

- Depending on where you want to install the case fans, you may need to take out other panels as well. To do so,
- The right side panel is generally connected using screws and comes off in a similar way to the left side panel. Some cases may have separate locking mechanisms.
- The front panel generally uses pressure clips to connect to the PC case. You can firmly hold the top of the panel with one hand and pull out the panel from the bottom. You can also do it in the opposite order.
If it is difficult to remove, have someone else squeeze the pressure clips while you pull the panel. - Most PC cases don’t come with a detachable top panel. For other cases, the steps should be similar to the front panel.
- If you have already installed the motherboard, you may have also attached its power/reset, USB, and HS Audio cables to the front/top panel. So be careful while removing it.
You may need to unscrew and take out these cable connectors before placing the panel somewhere else.


Some PC cases may require slightly different steps to remove the case fans. So, if you have trouble with opening the case, look into the official sources or the user manual. You can also check the teardown video for the exact PC case model.
Install Case Fans
If you are adding some more case fans on a PC you have used for some time, it might be dusty. In such cases, clean your CPU cooler along with the insides of the PC.
If you use an AIO cooler, clean the radiator as well if necessary.
Then (or if you the PC is already clean), install the case fans to the relevant fan slots. For that,
- If you have yet to install a motherboard, I recommend you place the motherboard on the case and screw it first. The I/O shield of the motherboard may obstruct you from using the case fan in the rearmost position on the top panel.
- If the case fans are dusty, clean them before installing them on the PC. Hold the fan blades in place while using compressed air to blow out all the dust. You can also use a brush and microfiber cloth to clean the fan blades and the fan housing.
- If the fan slot where you wish to mount the case fan is covered by a dust filter, remove it first. If it is magnetized, simply take it off. Else, you may have to unscrew it.
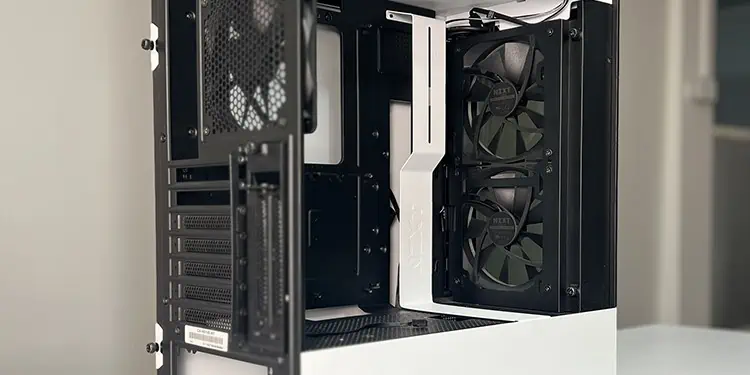
- Then, align the case fans to the appropriate slots where you want to install them. Make sure to check the fan direction carefully. You want to install the fans as intake on the front/bottom and exhaust at the top/rear end.
- Make sure the cables are out of the way of the fan blades before fastening the fans to the OC case.
- Tightly screw the fans to the slots using a screwdriver. It’s better to fasten one diagonally opposite corner at a time to avoid any alignment issues.
- Use the screws that came with the exact fans. Screws for different case fans may have different thread patterns and tolerance ranges. So, forcefully using other screws will damage the threads on the fans.


If you want to install an AIO cooler on your PC and are installing the case fans before that, you need to consider the following things as well.
- You have to leave space to mount the radiator. Also, check the case support for the radiator to determine where they go first. This way, you’ll know which fan slots you can use for the case fans.
- Bending the AIO tubes too much can make it leak, so it may not be possible to use it in certain configurations as intake or exhaust. Also, you can’t have the pump at the highest position in the loop, or else it will trap air bubbles and make noises.
Both these factors further narrow down where you can place the radiator, and, consequently, the remaining slots for the case fans.
Connect Fan Cables
Now connect the fan and RGB cables to the motherboard headers or a fan controller to power up and control the case fans. If you need any help to identify the necessary headers on the motherboard, check its user manual.
If you are connecting the cables to the motherboard,
- Use the CHA_FAN or SYS_FAN headers for the fan cable. They should also have plastic notches or guides to help you plug in the connectors.
- Don’t connect them to CPU_FAN or AIO_PUMP/W_PUMP headers as you need them for the CPU Fan/Cooler or the AIO pump.
- If your motherboard contains integrated CHA_FAN and W_PUMP headers, leave at least one pump header free if you wish to install an AIO cooler later.
- An RGB case fan may have non-addressable or addressable RGB connectors. You need to connect them to the motherboard’s corresponding LED headers.


If you want to use a fan controller (usually when the motherboard does not have enough headers),
- Mount the controller to the PC case. They usually come with a magnetized base to attach to the case. But if your case comes with slots for the fan controller, you can screw some controllers there as well.
- Connect the SATA to DC power cable from the controller to the SATA power connector of your PSU. If your controller comes with a MOLEX power cable instead, similarly connect it to the MOLEX connector from the PSU.
- If it comes with an USB pin header cable, connect the cable’s micro-USB connector to the fan controller and the other end to the motherboard’s USB header.
- Plug in the fan cables to the headers on the controller.
- You may be able to connect the fans’ RGB cables to the same controller. If it is not possible, use a separate RGB controller in the same way.


If the cables do not reach any headers on the motherboard or the fan controller,
- Obtain a fan extension cable and insert one end of it into the connector and another into the header on the board.
- You can also use a MOLEX extension with fan power. However, the fan will always run at full speed, and you won’t be able to control its speed.

You should also properly manage the cables using zip ties or velcro strips. If you had used a fan controller, route the cables properly through the right side panel before plugging them into the controller.
Reassemble PC Case
Now, install any other components that you have yet to mount on your PC, like the CPU cooler, graphics card, and so on. Then, re-assemble the panels onto your PC case by reversing the steps you took to take them out.
Set Fan Settings from BIOS
After installing the case fans (and any other components to make the PC operable), get to your motherboard BIOS to check your fan speed and modify it if necessary.
You may also need to set the fan mode to DC or PWM, depending on the type of fan you are using.

Then get inside your system (install Windows on your storage drive if you haven’t done so already) and monitor the CPU temperature and the GPU temperature.
This way, you can test out whether you have proper fan speed or if there are enough case fans.
I also recommend testing the GPU temperature while gaming, as this device depends the most on the airflow provided by the case fans.