Resetting or Reimaging your computer is a great option to consider if your computer is very old and running slow. Although these two have some similarities, they are slightly different processes. Reimaging is restoring your computer to a certain saved image whereas reformatting is deleting everything from the selected drive.
We’ve listed how to Reimage and Reformat your windows computer system in this article. Without further ado, let’s get into it.
How To Reimage a Computer?
Reimaging a system means making an image of your current system and restoring that image to a different or the same device. There are two ways to reimage your computer; using system image and system reset.
You can reimage your computer if you have to install the same instances of windows settings on multiple computer systems or if your computer is generally not performing well.
Using System image
There are some preliminary steps you have to make sure of before reimaging your computer system.
Backup Data
Before you go forward with the reimaging process, back up your files to a different drive. Reimaging your computer deletes all data on that drive including all your personal data on that drive, so copy all your data to a different external drive.
Prepare Image
You first need an image to restore from. If you don’t already have one, you can create a custom windows image to restore by using system restore. Here’s how you create a system image:
- Go to Settings
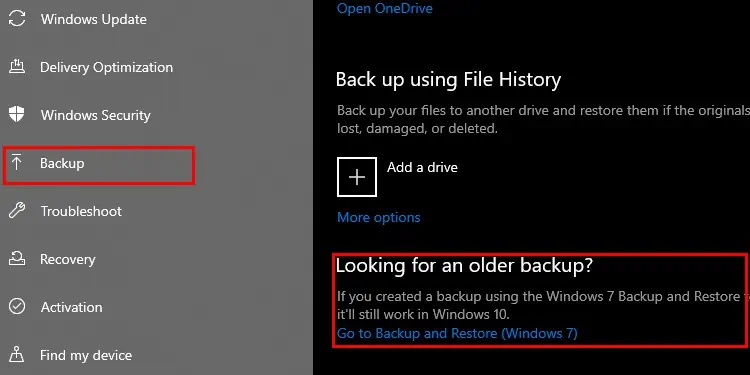
- Select Update & Security> Backup.
- Under Looking for an older backup? click on “Go to Backup and Restore( Windows 7)”

- Click on Create a system image on the left panel.
- It will prompt you to select a location to back up. Select the drive you want to backup to later restore and click next.
- It will then show you the information about the backup including its size. Click start backup to start the image backup process.
Reimaging the PC
After you’ve readied an image, you can now restore your computer to that image. You can restore the image by following these steps:
- Open Settings
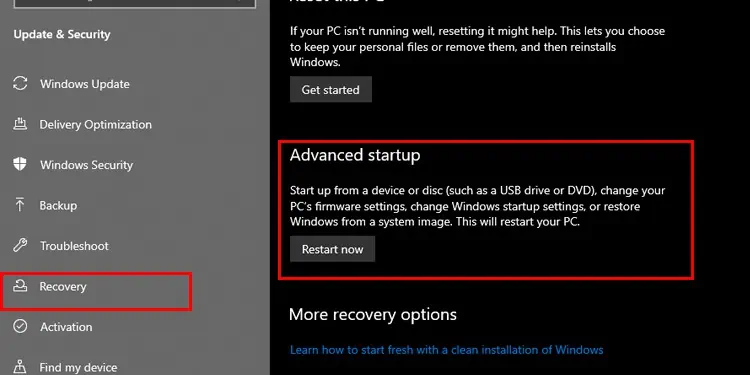
- Select Update and Security > Recovery.
- Under Advanced startup click on Restart now. This will restart your computer and enter advanced recovery mode.

- After restart, click on Troubleshoot.
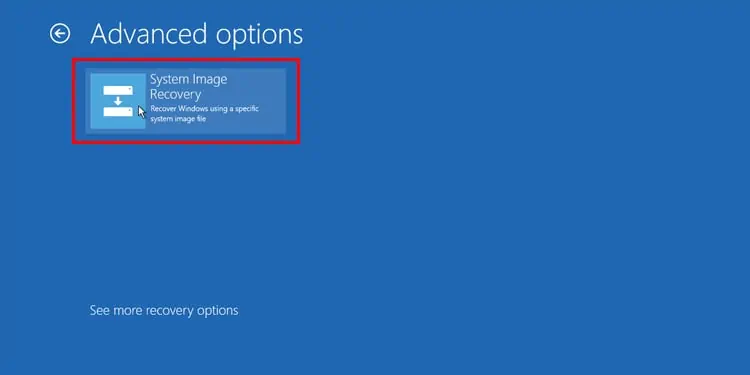
- Go to Advanced options > System Image Recovery. Then click on your Operating system prompt.

- Then the re-imaging wizard asks you to choose between the recommended image or any other image of your choice.
- Click Next after selecting the image of your preference.
- Tick the box if you want to format and partition the disk according to the image and click Next.
- Click Finish and confirm by pressing the ‘Yes’ button.
The restoring process can take some time to complete depending on the image size. A green bar tracking the progress will show up after you start the process. After the restoration completes, it will prompt you to restart the device to complete the image restoration process.
Using System Reset
You can directly reset your computer to factory settings through settings. Here’s how you do it:
- Open Settings
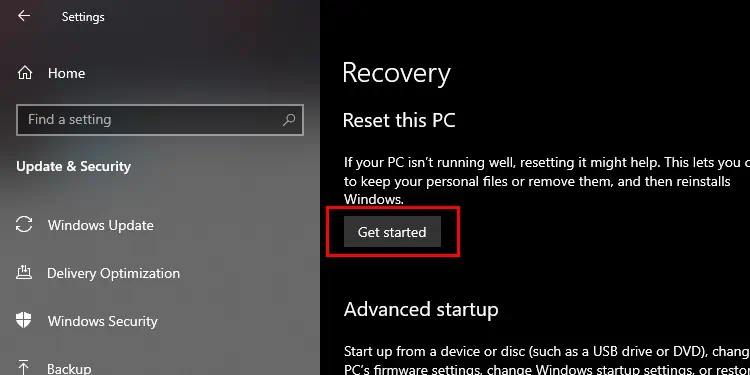
- Select Update and Security > Recovery.
- Under Reset this PC, click on Get Started to begin the reset process.

- A window will prompt you to confirm the reset. Click on ‘reset’ to start the reset process.
- You can also reset your PC through Advanced recovery options. Just click on Restart now under Advanced recovery.
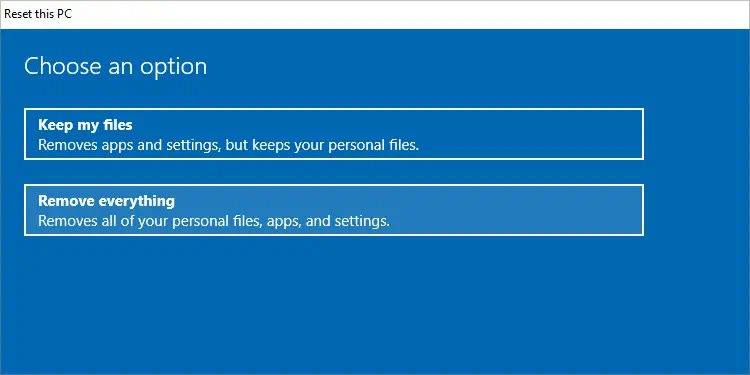
- A new window will ask you to choose between ‘Keep my files’ and ‘Remove Everything.’ Selecting keep my files will keep your files whereas ‘Remove everything’ will completely reimage your computer to factory mode.

- Then it will ask you whether you want to download a fresh copy of windows or install with local files. Choose your preference and confirm the reset.
- The rest process takes a while to complete. You will be greeted by Cortana after your windows reset is complete. Be careful not to interrupt your power supply to the pc to prevent any data corruption.
How is Reimaging different from Reformatting?
In the reimaging process, the system is formatted and then a saved image of the OS is restored. But formatting cleans off the drive and installs a fresh copy of Windows. Formatting takes much more time than reimaging. So, people prefer to reimage if they have to install a copy of Windows on multiple computers.
How to Reformat A Computer?
Reformatting is the process of completely clearing the disk drive to make way for a newer operating system. It will erase all existing data on your hard disk. So, remember to back up important data on a different drive or a disk partition.
You can use a bootable drive to reset your computer. You will need a bootable drive with an iso file. Follow this step-by-step guide to learn how to reset your computer.
- Insert the Bootable Disk and restart your computer.
- Enter your BIOS settings by pressing the respective function key.
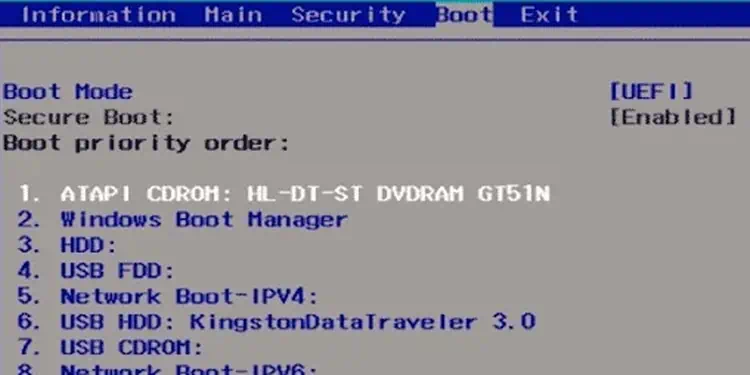
- Go to Boot Options. Depending on the BIOS version there may also be an option to change the boot order.

- Move the bootable disk to top priority through the instructions at the bottom of the BIOS screen.
- Save settings and exit the BIOS.
- Your next boot will directly boot you to the windows setup wizard.
- Complete the setup wizard to install windows on your computer.
Note: If you follow the system reset method with the steps we’ve listed above, You can also reformat your pc by choosing the ‘keep my files’ at step 5.
FAQs
How Long Does It Take To Reimage?
The reimaging process may take 20 minutes to a couple of hours. Do not interrupt the power supply while the reimaging process is going on as it may permanently corrupt the OS. You will have to start again if it gets interrupted.
Does Reimaging Get Rid of Viruses?
If you’re reimaging to the factory state, this should get rid of any viruses. On the other hand, if you’re using a custom image, viruses may also get restored. Reimaging makes an image of the system at any given time, including the viruses. However, Reformating your computer will remove all files including viruses.

