Tech News Today
  • Hardware
    • Motherboards
    • CPUs
    • Graphic Cards
    • RAM
    • SSDs
    • Computer Cases
    • Monitors
    • Peripherals
    • Power Supply Unit
    • PC Builds
    • Computer Tips
  • Software
  • Operating System
    • Windows
    • Mac
    • Linux
  • Gaming
  • Mobile
  • Console
  • More
    • Internet
    • Networking
    • Security
    • Buyer’s Guide
    • Gadgets
    • Laptops
    • Reviews
    • How To
    • News
Facebook Twitter Instagram
Tech News Today
  • Hardware
    • Motherboards
    • CPUs
    • Graphic Cards
    • RAM
    • SSDs
    • Computer Cases
    • Monitors
    • Peripherals
    • Power Supply Unit
    • PC Builds
    • Computer Tips
  • Software
  • Operating System
    • Windows
    • Mac
    • Linux
  • Gaming
  • Mobile
  • Console
  • More
    • Internet
    • Networking
    • Security
    • Buyer’s Guide
    • Gadgets
    • Laptops
    • Reviews
    • How To
    • News
Tech News Today
Home»Windows»Fix: A Media Driver Your Computer Needs is Missing

Fix: A Media Driver Your Computer Needs is Missing

Abhishek SilwalBy Abhishek SilwalDecember 22, 2022
a media driver your computer needs is missing

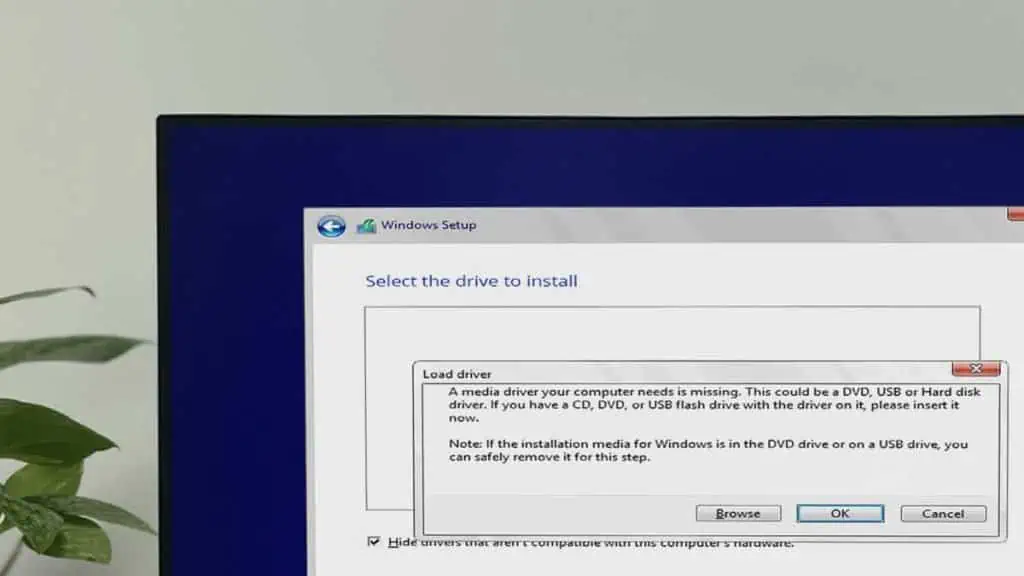
You usually get the “A media driver your computer needs is missing” error while installing Windows on your system if you don’t have the correct installation media. This issue can also occur if the files in the media are corrupted.

Depending on whether your firmware is in BIOS mode or UEFI mode, you need to prepare a healthy installation media with MBR or GPT-supported Windows partition, respectively.

In addition to these, there may also be a few other possible reasons for the error, such as the actual absence of SATA/RAID/PVSCSI drivers.

Table of Contents

  • To Fix “A Media Driver Your Computer Needs is Missing” Error
    • Re-create Installation Media
    • Install Disk Driver
    • Convert BIOS to UEFI
    • Check USB Drive for Errors

To Fix “A Media Driver Your Computer Needs is Missing” Error

First, after you encounter the error message, click Cancel and remove your USB installation media. Then, plug it into another port and try installing Windows again. If you still encounter the error, follow the possible solutions below.

Re-create Installation Media

Since the disks with different partition styles need different types of installation media, you need to re-create one appropriately. 

Before you begin, it’s best to know the following things to be able to create an error-free installation media:

  • The Windows ISO file you download or transfer must be complete. You can check the hash of the file with that included on the download page of the ISO file. To check a file’s hash, you need to enter Get-FileHash “Path of file” on PowerShell.
    get-file-hash
  • The apps to create an installation disk on other OS (Linux or Mac) may not properly create a Windows installation media. So, it’s always better to do so from a Windows system itself if possible.
  • It’s better to use USB drives as installation media instead of CD/DVD, even if you have such devices on your computer, as they are more prone to failure.
  • You can’t use a recovery disk to install Windows. It does not include all the files and drivers necessary for the installation.
  • Also, methods like directly making a USB installation disk from media creation create a GPT partition compatible Windows installation drive only, so you may encounter the above error if you try using it on an MBR-based hard drive. This is why we recommend using Rufus instead, as it allows you to choose a partition type while creating the media.

With that out of the way, here’s how you can create the USB installation drive:

  1. First, you need to create a Windows ISO file. If you use other methods to download or create one, make sure to check its hash (see above).
    • Go to Microsoft’s Windows download webpage and select the Windows version.
    • Click Download now under Create Windows installation media.
      create-windows-installation-media-download-now
    • Run the Media Creation tool and accept the license agreements.
    • Check Create installation media (USB flash drive, DVD, or ISO file) for another PC and click Next.
    • Uncheck Use recommended options for this PC and change the options according to the PC where you need to install Windows. Then, select Next.
    • Check ISO file and click Next.
      iso-file-media-creation
    • Navigate to the folder you want and click Save.
    • Click Finish after the process completes.
  2. Download and launch the latest version of Rufus.
  3. Choose your USB drive under Device.
  4. Click SELECT under Boot Selection to search for the ISO file.
  5. Navigate to the ISO file and double-click on it.
  6. Set Image option to Standard Windows installation.
  7. Choose GPT or MBR for the Partition Scheme according to the computer where you need to install Windows.
    rufus-drive-properties
  8. Set Volume label as you want and File system to FAT32.
  9. Expand Show advanced format options.
  10. Tick Check device for bad blocks and set the drop-down box next to it to 2 passes.
    rufus-format-options
  11. Click START to start creating the installation media.

Install Disk Driver

If you are trying to install Windows to a BIOS/MBR-bases SATA or RAID setup drive, you need a proper driver, such as Intel Rapid Storage Technology Driver (IRST). If the USB installation media doesn’t have such a driver, you need to download it and then load it to the PC.

  1. Download the proper driver from official websites on another computer.
  2. Extract the driver to a different USB flash drive and then connect it to the PC where you have the above error.
  3. If the error message is still there, click on OK. And if you are on the “Where do you want to install Windows?” screen without any drives, select Load driver > OK.
    windows-setup-load-driver
  4. Click OK again and then Browse.
  5. Navigate to the driver and click OK.
  6. Select the driver from the list and hit Next.

After the process completes, the disk should show up, and you can continue with your Windows installation.

If you encounter this error on VMware ESX, you need to install the PVSCSI driver instead of a SATA or RAID driver. The method to do so is slightly different for the VMware ESX or ESXi.

  1. On VMware ESXi, right-click on the VM and select Edit Settings.
    edit-settings-vm-esxi
  2. Click Add other devices > CD/DVD Drive.
  3. Scroll down to the new CD/DVD Drive and set the drop-down box to Datastore ISO File.
  4. Navigate to /vmimages/tools-isoimages and select windows.iso
    vmimages-tools-isoimages
  5. Click on Save.
  6. Return to the VM console and click Load driver > Browse.
  7. Select CD Drive and go to VMware Tools > Program File > VMware > VMware Tools > Drivers > pvscsi > amd64. Then, click OK.
  8. Select the PVSCSI driver and click Next or OK to install it.
  9. Then, continue with your Windows installation.

The exact steps may differ depending on the type or version of the software, but the general process is the same.

Convert BIOS to UEFI

You can also convert your Boot mode from BIOS to UEFI to be able to install Windows from a GPT-supporting installation media without any issues. All the latest systems are made for UEFI-based disks, so it’s better to change to it if possible.

Before you begin, check whether your computer supports UEFI mode or not. If it is a new PC with x64 system architecture, it should support UEFI. For older computers, check with the motherboard manufacturers first.

Then, if you are reinstalling Windows on your PC, which already has an OS,

  1. First, make sure to back up any data you want, if possible. While the method here doesn’t lose your data, it’s better to be more careful.
  2. Then, click on the Restart button on the power options while pressing Shift to boot to Advanced Startup.
  3. Go to Troubleshoot > Advanced options > Command Prompt.
    choose-command-prompt-winRE
  4. Enter the command bcdedit.
  5. Check the value of Path under Windows Boot Loader.
    windows-bootloader-path
  6. If it shows \Windows\system32\winload.efi, you already have UEFI. If it shows \Windows\system32\winload.exe, you have a legacy BIOS, so you can follow through with the remaining steps.
  7. Enter the commands below:
    • mbr2gpt /validate
    • mbr2gpt /validate /allowFullOS
    • mbr2gpt /convert /allowFullOS
    • exit
      convert-mbr2gpt-in-cmd
  8. After that, go to Troubleshoot > Advanced options > UEFI Firmware Settings > Restart.
  9. On the BIOS interface, search for your BIOS mode option and set it to UEFI. Different motherboards use separate interfaces and options, so check official sources if you can’t find the option.
  10. Save and exit BIOS.
  11. Now, you can directly create a USB installation disk through media creation or use built-in options to create a GPT-compatible media and use it to install Windows.

And if you are installing Windows on a new PC, you can use a different method. This method is not suitable for the above situation as you need to wipe all data from your disk.

  1. Power up your PC and boot to BIOS. You can press the BIOS key multiple times as soon as the computer starts booting to do so.
  2. There, search for your BIOS mode option and set it to UEFI. Different motherboards use separate interfaces and options, so check official sources if you can’t find the option. Ignore any warnings you get. 
    uefi-boot-mode-in-bios
  3. Change the Boot order to boot using the installation drive if you haven’t done so already.
  4. Then, save and exit the BIOS.
  5. Now, boot using the installation media and set your language preferences.
  6. On the Windows setup screen where you see Install now, click Shift + F10.
  7. Here, enter the following commands:
    • diskpart
    • list disk (check the disk number for the disk where you want to install Windows)
    • select disk # (replace # with the disk number from above. For instance, select disk 0)
    • clean
    • convert gpt
    • exit
    • exit
      convert gpt
  8. Then, continue with the installation.

Check USB Drive for Errors

If you meet all the requirements for the installation media as we discussed above, it is possible that your USB drive is corrupted. You can run the CHKDSK tool from a working Windows system to repair any possible corruption. 

  1. Open Run.
  2. Type cmd and press Ctrl + Shift + Enter to open the Elevated Command Prompt.
  3. Enter the command chkdsk /r /x E: while replacing E: with the drive letter of the USB drive.
    chkdsk-r-x-e

If you don’t have access to another PC,

  1. When you get to the Install now screen, press Shift + F10.
  2. Here, enter the following commands:
    • diskpart
    • list volume (note down the drive letter of the USB drive)
    • exit
    • chkdsk /r /x D: while replacing D: with the drive letter from above.
      list-volume-chkdsk

If CHKDSK finds but can’t resolve some errors, you need to use another USB device instead.

fix
Abhishek Silwal
  • LinkedIn

Abhishek Silwal is an Electronics Engineer and a technical writer at TechNewsToday. He specializes in troubleshooting a wide range of computer-related issues. His educational background in Electronics Engineering has given him a solid foundation in understanding of computers. He is also proficient in several programming languages and has worked on various robotics projects. Even in his early days, he used to tinker with various computer components, both hardware, and software, to satiate his curiosity. This experience has given him a breadth of experience that goes beyond his educational qualification. Abhishek has been writing articles on dealing with varieties of technical issues and performing specific tasks, especially on a Windows machine. He strives to create comprehensive guides on fixing many system and hardware issues and help others solve their problems. You can contact him at abhisheksilwal@technewtoday.com

Related Posts

Reset BIOS password

4 Ways to Reset BIOS Password

January 28, 2023
how to make windows 11 look like windows 10

How to Make Windows 11 Look Like Windows 10

January 25, 2023
how to find hidden folder in laptop

How to Find Hidden Folder in Laptop

January 24, 2023
mouse not showing in chrome

Mouse Not Showing in Chrome? Here’s How to Fix It

January 25, 2023
how-to-move-taskbar-windows-11

How to Move Taskbar on Windows 11

January 24, 2023
stickers on windows

How to Add Stickers on Windows 11 Desktop

January 23, 2023
Add A Comment

Leave A Reply Cancel Reply

Latest Posts
how long does a cmos battery last

How Long Does a CMOS Battery Last

January 25, 2023
thunderbolt vs usb c

Thunderbolt Vs USB C: What’s the Difference

January 25, 2023
how to find hidden folder in laptop

How to Find Hidden Folder in Laptop

January 24, 2023
You may also like
Reset BIOS password

4 Ways to Reset BIOS Password

January 28, 2023
How to clean usb port 1

How to Clean USB Port on PC (Comprehensive Guide)

January 27, 2023
lenovo battery not charging

Lenovo Battery Not Charging? Try These Fixes

January 27, 2023
Recommended
Cookie Clicker Garden Guide

Cookie Clicker Garden Guide to Unlocking Every Seed

September 26, 2021
monitor no signal

Computer Turns On But Monitor Says No Signal (9 Ways To Fix)

November 10, 2022
Facebook Twitter Pinterest
  • Home
  • About Us
  • Our Team
  • Editorial Guidelines
  • Privacy Policy
  • Affiliate Disclosure
© 2023 TechNewsToday.

Type above and press Enter to search. Press Esc to cancel.