Overheating is a serious issue and can happen while playing games or using resource-hungry applications. Ultimately, this can make your computer laggy and, in the worst case, can decrease its lifetime.
Are any heavy programs running in the background, or did you overclock the CPU and other components? Well, such actions can eventually make your laptop overheat.
If your laptop freezes, stuck with a black screen, or makes unnecessary noise, these are all the primary signs of overheating. Nonetheless, you can take preventive measures to stop them, and that’s exactly what you’ll learn in this article.
How Can a Laptop Overheat?
Whether it be your laptop’s CPU, GPU, HDD, SSD, or other hardware components, everything can overheat, mainly due to insufficient cooling. Although most laptops come with an air or water-cooling mechanism, they can still overheat and can eventually damage your hardware components.
- Incorrect position or surface
- Direct exposure to sunlight
- Usage of resource-hungry applications
- Opening excessive browser tabs
- Malware infection
- Overclocking CPU, GPU, or other laptop components
- Fans and vents are clogged
- The cooling system and other parts are faulty or damaged
10 Ways to Prevent Your Laptop From Overheating
Typically, most laptops perform best when the temperature at around 35-degree celsius. But running heavy apps or playing intensive games can increase the temperature to approximately 60 degrees.
However, if it exceeds this temperature, you might want to cool your laptop as soon as possible. But if your computer heats further and goes higher than 80-degree celsius, you may face critical errors, or your system might even shut down.
Clearly, overheating can be a headache, but what if we tell you this can be prevented and you can keep your laptop at an optimal temperature?
But before moving on, we suggest shutting off your computer or putting it to sleep when you’re not using it, depending on the situation. This is because using your laptop continuously for hours will overheat the internal components.
Furthermore, we recommend adopting each of the below effective measures to prevent your laptop from overheating.
Adjust Laptop Position and Use the Right Surface
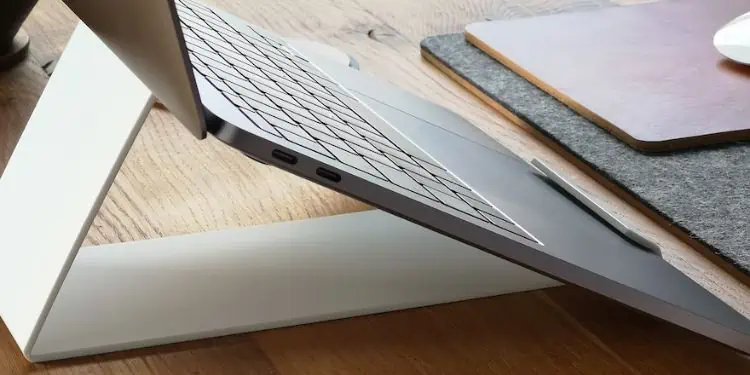
Firstly, your laptop’s position is an important thing to consider. Basically, if you’re keeping your device flat, the airflow between the vents and your laptop cooler gets trapped. Eventually, this can overheat the motherboard, CPU, GPU, and other internal components.
Secondly, placing your laptop on your lap, bed, or other surfaces can also block the airflow. This is also why your cooler starts producing rattling or bubbling noises.
Hence, we highly recommend slightly elevating your laptop. You can keep a couple of books underneath the device’s surface, which will likely unblock the vents and release the air bubbles trapped inside.
Moreover, if you’re ready to spend a few bucks, you can even get a laptop stand or a cooling pad. Well, these tools do not just regulate your laptop’s temperature but also improve ergonomics.
Use Laptop in the Right Environment
Another factor for laptop overheating can be your workplace. If you’re using your device in direct sunlight, it’s pretty sure it will be heated.
Although it’s beneficial for your health to stay in the sun, it’s the opposite for laptops. Basically, prolonged exposure to hot temperatures can damage the LED/LCD screens or swell the battery, eventually damaging it. Likewise, we highly discourage using your laptop near a radiator or inside a room with high temperatures.
Well, your ideal workplace should be cool, and in case the laptop starts overheating, you can place a small fan near it. Furthermore, an air-conditioned room is ideal, but if you do not have such a facility, we suggest opening the windows that should cool your workplace.
Limit Browser Tabs and Heavy Applications
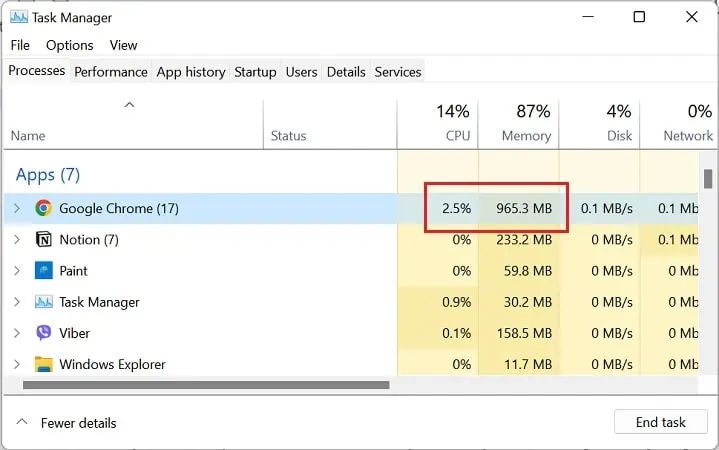
Most of us have a habit of opening many browser tabs that take a significant percentage of memory. Similarly, launching intensive programs can also overheat the CPU and RAM. Let’s find this out practically using the below steps:
- Launch Task Manager using the Ctrl + Shift + Esc shortcut.
- Under the Processes tab, you’ll find a list of applications. Here, you can check for those apps taking up the highest CPU, memory, GPU, and power. Indeed, you can notice that a web browser takes up one of the maximum usages.

- Now, if you’re not using a specific application, we recommend ending its task. Similarly, you can close those browser tabs that aren’t necessary.
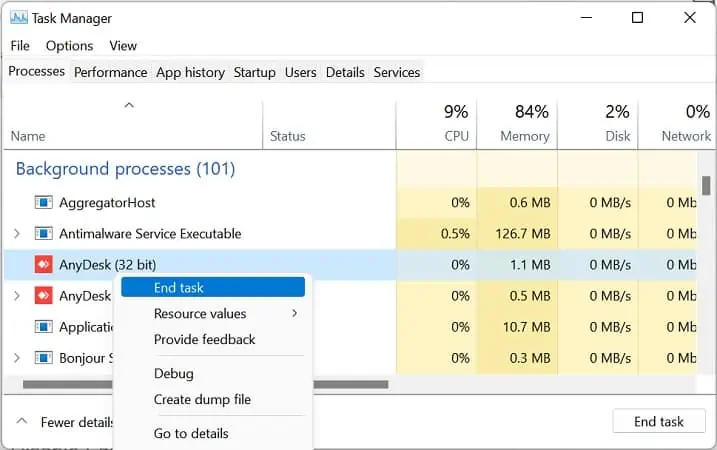
Furthermore, some background apps and processes can also significantly take up memory and power. Indeed, this could be another factor that can overheat your laptop. To check and end these background programs, you can take help from the below guide:
- From the Task Manager window, move to the Background processes in the Processes tab.
- Here, find those apps and services with high memory, CPU, GPU, and power usage.
- Now, right-click on each of them and press End Task.

Regularly Scan for Malware
Some disruptive viruses can drain your system’s power, knock out essential system files, and use excessive resources if your computer is corrupted with malware. Thus, it’s evident that they can overheat your laptop components.
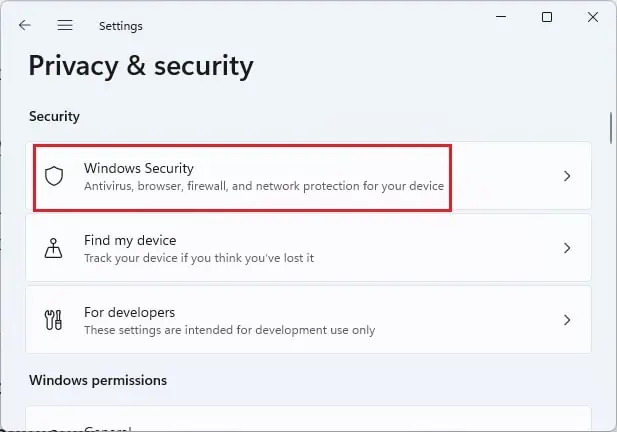
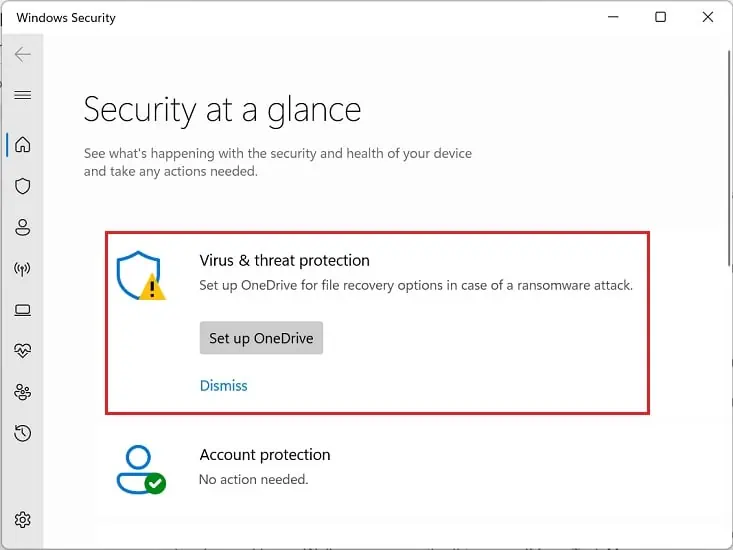
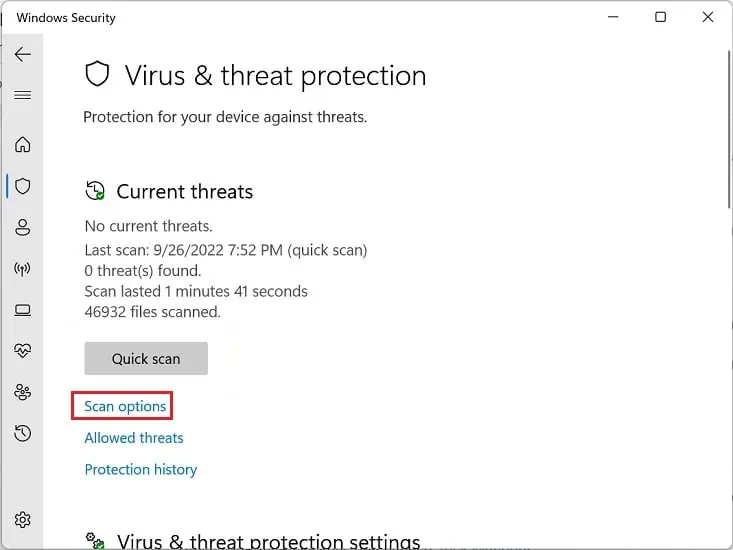
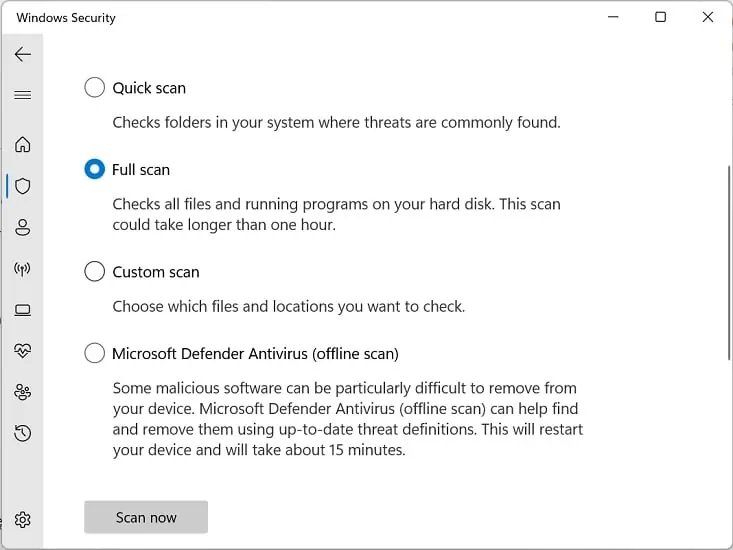
So, we recommend scanning your computer thoroughly once in a while to ensure that such a problem doesn’t exist. Here’s a simple overview of how you can do so on Windows 11:
- Using the Windows + I shortcut key, open Settings on your laptop.
- Move to Privacy & Security and choose Windows Security.

- Under Protection Areas, select Virus & threat protection.

- Next, click on Scan options.

- Here, choose the Full scan option and hit the Scan now button.

- Now, wait until all your Windows files are appropriately scanned. This can take several minutes, depending on the number of system files.
Decrease Screen Brightness and Adopt Battery Saver
The increased screen brightness can also cause your laptop to heat unnecessarily. This is because the brighter the screen, the more power your screen consumes. Moreover, this is also not ideal for your eyes, as brighter screens can cause eye strain and fatigue.
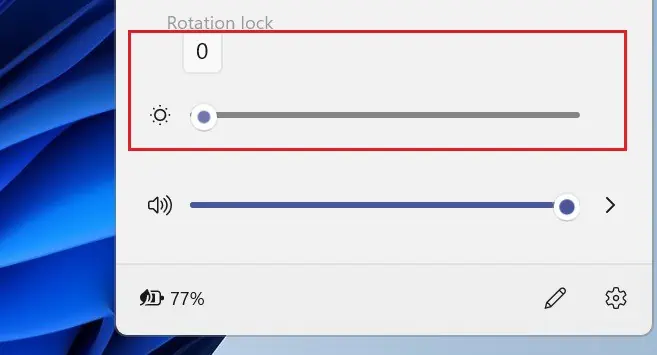
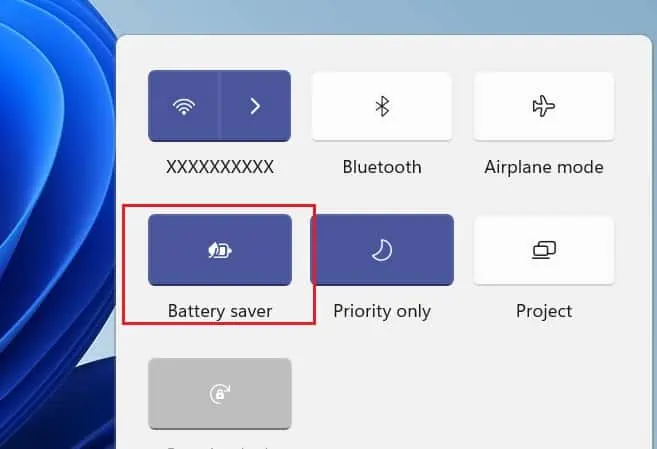
Interestingly, the battery-saver feature on Windows helps improve your laptop’s battery life. Below is a complete guide on how you can decrease screen brightness and adopt battery saver on your Windows-based laptop to prevent it from overheating:
- Press the system tray from the bottom-right corner of the Windows taskbar.
- Here, use the slider to decrease the brightness.

- Next, find and select the battery icon labeled ‘Battery saver’ to enable the battery-saver feature.

However, this feature gets disabled when you’ve connected your laptop to the power source.
Note: In most laptops, there are dedicated buttons to increase/decrease the brightness. Generally, they are present in the function keys with brightness icons engraved in them.
Change Power Plan
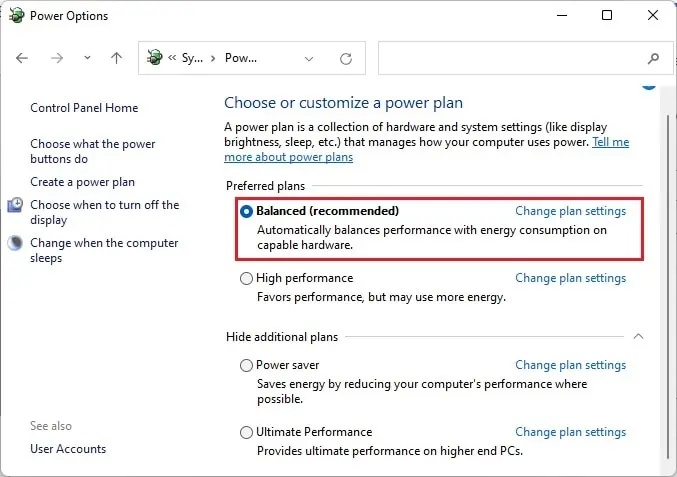
If you have set your power plan to High Performance, you might enjoy the best performance. However, this consumes more energy and will significantly reduce the battery life. Moreover, your laptop likely heats up when it performs at its best battery level.
Thus, it’s best to set the power plan to Balanced or Power saving, if available. Kindly go through the below steps on how to configure power settings on Windows 11:
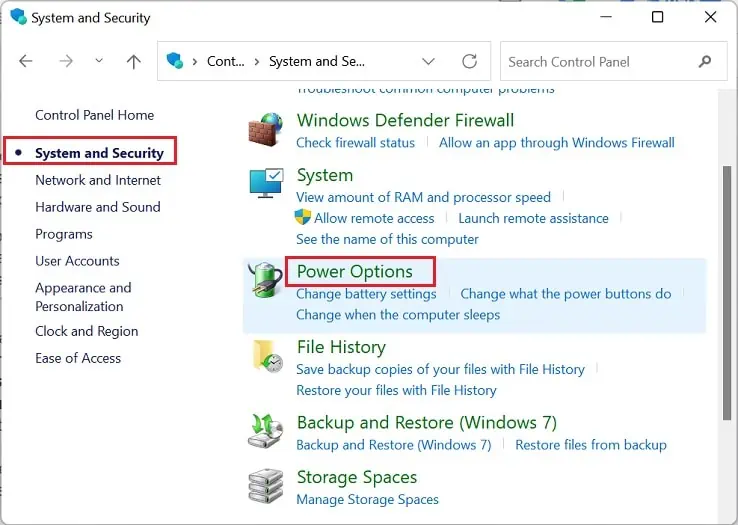
- Launch Control Panel using the instant search feature on the taskbar.
- Then, go to System and Security > Power Options.

- Here, select Balanced if you have set it to ‘Maximum Performance’ or ‘Ultimate Performance’.

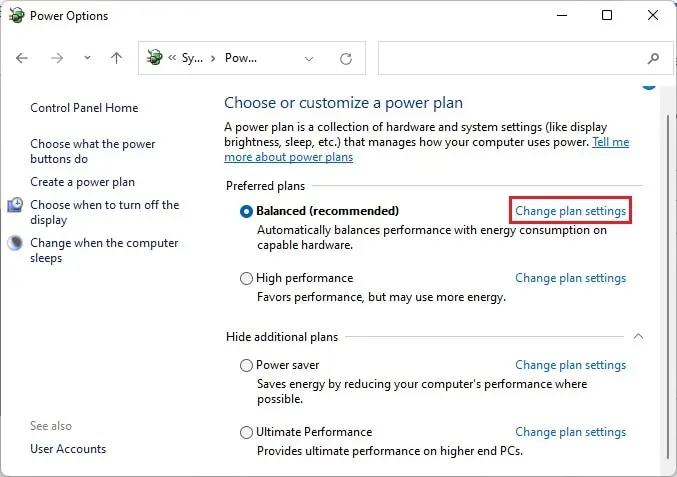
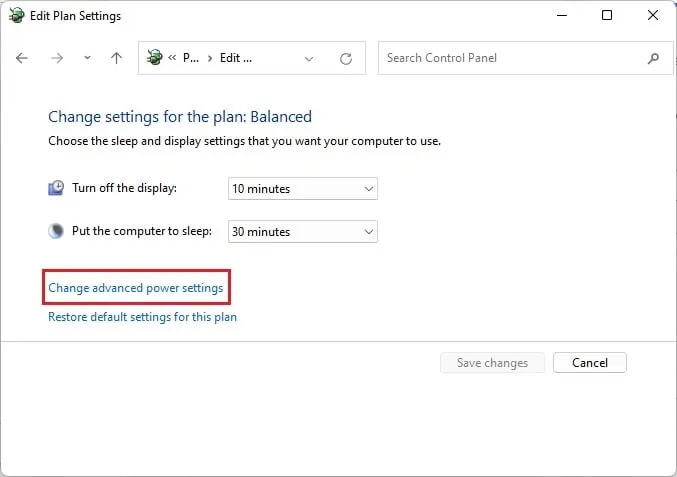
- Next, click on Change plan settings.

- Then, choose Change advanced power settings to launch the Power Options window.

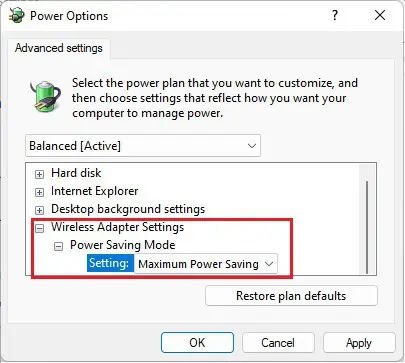
- Expand the ‘Wireless Adapter Settings’ from the list and again expand ‘Power Saving Mode’. Here, set the On Battery and Plugged In options to Maximum Power Saving.

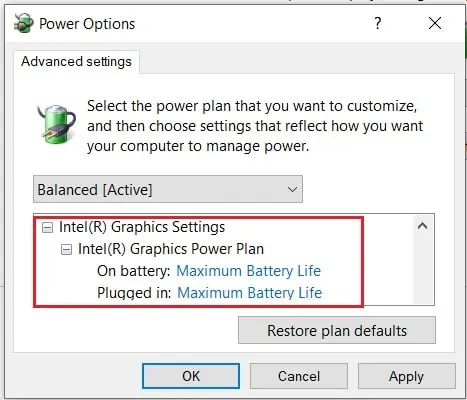
- Switch to your graphics settings and expand the power plan option. Here, set the On Battery and Plugged In options to Maximum Battery Life.

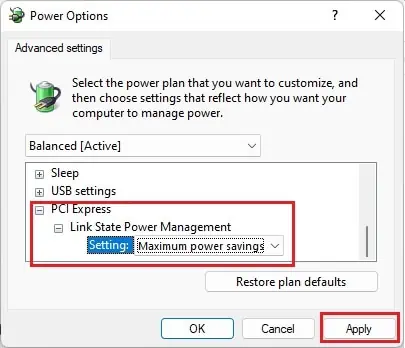
- Next, expand the ‘PCI Express’ option and go to ‘Link State Power Management’. Here, set both settings to Maximum power savings.

- Finally, tap on the Apply button, ensuring your battery consumes less energy, meaning the chances for your laptop to overheat has decreased.
Avoid Overclocking
Basically, overclocking means increasing the clock rate of hardware components to gain higher performance. However, this technique utilizes more power and eventually overheats the system.
In fact, overclocking can cause permanent damage to your components. Hence, if you’re planning to overclock your GPU, CPU, laptop monitor, or other parts, we do not recommend doing it.
Moreover, if you have already overclocked one of your components and have started witnessing the overheating problem, it’s time you underclock it.
Clean Laptop Vents and Fans
Often, when we place our laptops on dusty surfaces, there’s a high chance this dust gets stuck in the vents and the inner fans. In fact, if you haven’t cleaned the fans and vents for a long time, check them once, and you’ll find how dirty they have become.
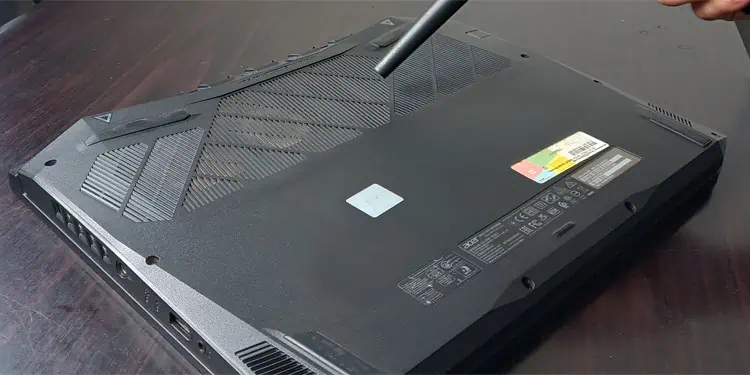
Undoubtedly, clogged fans block the airflow and overheat all the inner laptop components. Hence, we highly suggest cleaning both the fans and vents regularly to prevent overheating issues:
- Firstly, shut down your laptop and remove its battery. While you’re at it, also disconnect the USB devices if connected.
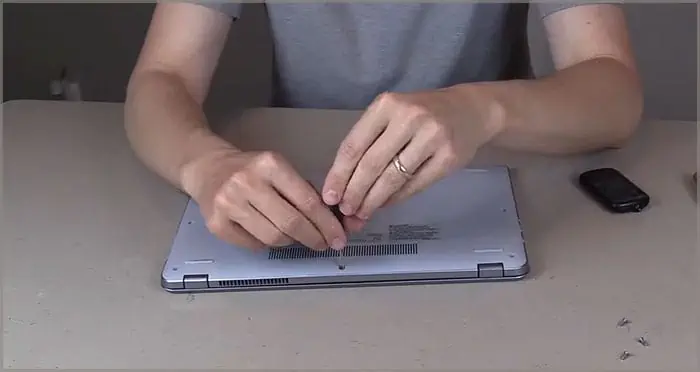
- Secondly, unscrew the back panel and carefully open the casing.

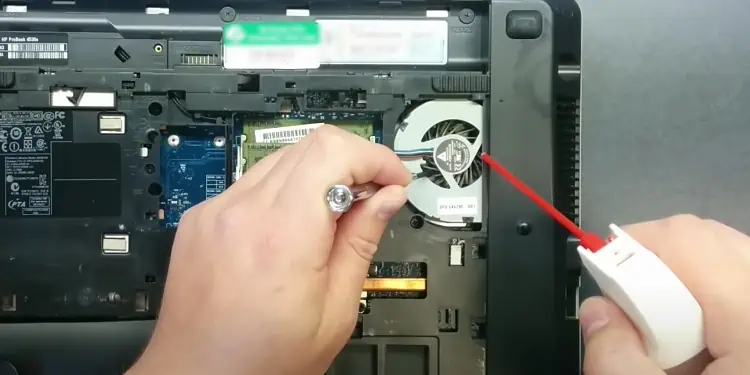
- Use compressed air to blow off dust particles from both the CPU and GPU fans.

- Next, dip a microfiber cloth in a mixture of 70% isopropyl alcohol and water. Use this to clean all the fan blades.
- Use a small cleaning brush in the corners to remove dirt and sludges.

- Now, move to the laptop vents and use the dipped microfiber cloth to clean the surface.
- Next, use a toothpick or cotton pad to remove any dirt or sludge stuck inside.
- Then, use compressed air to dry both the fans and inlet vents.

- Finally, close the casing and tighten the screws.
Configure Fan Speed in BIOS
If your fan speed isn’t correctly configured, you’ll likely notice that the laptop overheats. Generally, if the fan’s speed is slow or too high, such a problem can exist. Hence, configuring it is pretty essential, and here’s how you can do it:
- First, shut down your laptop and get into the BIOS using the manufacturer’s dedicated key.
- Once the BIOS setup launches, move to the Power settings, where you should find the CPU Fan Speed.

- Now, check your manufacturer’s manual to identify the correct fan speed range. Well, this can go from 400 to 3200 RPM, depending on the fan’s height or thickness.
- Finally, save the settings using the dedicated key.
Although increasing fan speed is one of the options to prevent your laptop from overheating, if the blower motor spins too much, it can potentially overheat the nearby components. Hence, if you notice your fan’s spinning more than it should, we recommend slowing it down.
Regularly Check Laptop Components & Replace If Necessary
Lastly, checking your laptop components regularly gives you an idea of whether they are working correctly or require replacement. Indeed, damaged CPU fans, GPU, HDD, SSD, RAM, and other internal parts may overheat your laptop.
- Replace the laptop’s battery
- Upgrade the laptop’s graphics card
- Upgrade your laptop’s RAM
- Upgrade CPU on laptop
- Upgrade SSD or HDD

