
Frequent freezing, random crashes, restart loops, blue screens, and loud fans, are some of the major signs of CPU overheating. Performance degradation is certain but the most worrying factor is – this can reduce the processor’s lifespan.
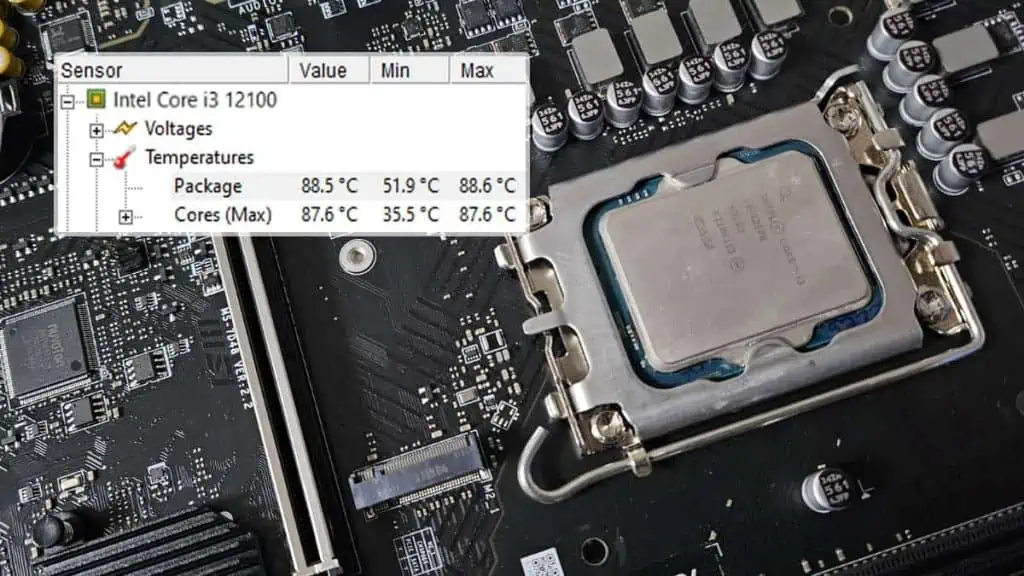
A good way to start is by checking the CPU temperature. Is it reaching 90 or even going beyond 100 degrees?
It’s completely acceptable for CPUs to reach 40 to 60°C when performing normal tasks. And nearly 85 to 90°C when running intensive tasks, like gaming.
However, the safe temperature limit varies depending on the processor.
For instance, the max. operating temperature for my Ryzen 5 5700G APU is 95°C. But when it reaches such a high temperature, it thermal throttles, causing a significant loss in performance.
Although that’s a good thing (prevents the CPU from overheating further), you wouldn’t want a slower speed with reduced performance.
Nonetheless, let’s move on with the fixes then.
Ensure Proper Air Flow and Ventilation
Your CPU cooler is meant to dissipate heat away from the processor. Besides, the accumulated hot air needs to move out from the PC casing as well. Otherwise, even other components like GPU, PSU, and even the motherboard may overheat.
That said, where and how you have positioned the PC matters the most. Is it placed in the ground or somewhere inside a cabinet? If so, I doubt that the intake fans can take the cool air inside the casing.

An effective method to verify this is opening the side panel. Now, check if the temperature lowers slightly. Note that this will expose the internal parts to dust, and hence isn’t recommended for a long time.
If the above case is true, you need to move your PC to a location where there’s proper airflow. Make sure the intake and exhaust fans aren’t blocked by any means.
Keep in mind that room temperature also matters! That’s the reason I always prefer placing my PC in an air-conditioned room, which surely helps the system remain cool.
Clean the Fans and the Heatsink
Dust buildup can cause the fans to stop working properly or in some cases stop working completely.
In that case, I recommend you thoroughly clean the Case Fans along with the coolers. While at it, don’t forget to remove dust from all the other PC components.

Check and Configure Fan Speed
CPU fans are meant to run at different RPMs, adapting to the change in processor temperature. This means that if the CPU overheats, it should run at the highest speed possible.
You can check the CPU fan speed from BIOS or even using an OEM-based utility. If yours isn’t optimized, I highly recommend going through my detailed guide on controlling fans on any PC. This should help you set a custom or even manual speed curve.
The recommended setting is to keep the duty cycle to 100% at 75°C. But since your processor is overheating, try reducing the limit to say 50 or 60 degrees. This will trigger the fans to run at full speed and help cool the CPU from the very start.

Besides CPU fans, I also recommend optimizing the speed of the case and optional fans. And if you have installed an AIO or custom loop, make sure the pump is running at all times. Also, check whether the radiator fans are spinning or not.
In case the CPU cooler isn’t working, you should meet with an error. This mainly happens when there are issues with the CPU Fan header. Reconnect or try a different motherboard fan connector if required.
Revamp Your OC Settings
If you have overclocked your CPU, there’s a high chance that the temperature is going beyond the specified limit. Many recommend stopping it, but I believe revamping the setting would be the better option for you.
Chances are your OC settings weren’t optimized in the first place. Setting the processor to a high clock speed can still make your PC boot up. But if you monitor its temperature, I’m pretty sure you’ll get high readings.
That’s the reason I always recommend performing a stress test after increasing the core ratio or base clock. This gives an idea of whether or not the computer is stable under the new OC settings.

Your system is likely to crash and the CPU overclocking won’t work, thanks to thermal throttling. In fact, you’ll likely meet with the “CPU Over Temperature limit” error the next time you start your PC.
Keep reducing the frequency and stress test each time until the temperature doesn’t exceed 90 degrees. Make sure your system is stable and can handle any intensive task without freezing or crashing. Indeed, this is the best way to optimize CPU performance.

Another great solution is undervolting the CPU. This is beneficial for users who are facing extreme overheating problems despite the processor running at stock frequency.
Note: Most manufacturers recommend updating BIOS to the latest version before overclocking the processor. If you hadn’t gone for an upgrade earlier, I recommend doing so this time for better compatibility.
Reapply Thermal Paste
Cleaning cannot help in most cases. If you or the one who built your PC used a low-quality thermal paste, chances are it has dried. This has probably led to unexpected overheating issues despite everything looking just fine.
Such problems have come up several times in our workplace too! Simply reapplying a good-quality thermal paste helped us solve it.
Ceramic and carbon-based are the most popular ones and I recommend the same. You may experiment with silicon, metal oxide, liquid metal, and other thermal paste types to find what’s best for you.

An amount equal to the size of a rice grain is usually enough. However, for some large-sized processors (for example, AMD Threadrippers), you’ll need to apply a little more.
That was the mistake I made last time and the CPU temperature had crossed 100°C when playing fast-paced games.
Besides, the thermal paste pattern also matters the most. Here are some of the tested ones from my colleague, Abhishek, to help you choose the best:

After applying the paste, make sure you clean the heatsink or AIO before reseating it. Sometimes, a gap remains between the IHS and the base plate, which may form air bubbles. This delays the heat transfer and thus the CPU overheats.
To prevent this, make sure you’ve properly screwed everything. Also, check whether yours comes with a back plate. Quickly remounting the processor wouldn’t be a bad idea either.
Additional Tip:
These days, you can even find CPU contact frames that have significantly improved cooling for most users. Currently, I’m using one from Thermal Grizzly on my LGA 1700 motherboard.
It has resolved the issue of uneven contact pressure that existed during the installation of Alder Lake and Raptor Lake processors. Thanks to the contact frame, the heat dissipation has significantly improved.
Upgrade Your Cooling System
If nothing helps, there’s probably something wrong with your cooling system. In case you’re still using the stock cooler, I highly recommend replacing/upgrading to a better one.
You can go for either an air (HSF) or a liquid-cooling AIO solution. Both have their own pros and cons. Also, their cheaper variants are trustworthy and much better than the stock ones.

During the CPU cooler installation, make sure you place the fans in the proper spot. For instance, in a twin-tower heatsink setup, two fans are mounted in the opposite direction. One pushes hot air out and another pulls cool air into the tower.
Along with these, make sure you’ve added enough case fans. This helps maintain proper airflow throughout the system, preventing the CPU and even other components from overheating.
In case your PC case is leading to poor air circulation, it might be time to upgrade it as well. No worries! We’ve got you covered with the best airflow PC cases that suit your needs.
For Experts:
Delidding the CPU is a professional technique to reduce CPU overheating. This involves removing the integrated heat spreader (metal base) and replacing its inner thermal compound. However, this is only recommended for experienced users and enthusiasts.
Tests from professionals have shown that this helps temperature drop anywhere from 3 to 15°C. So, only proceed if you think it’s worth going for it. Personally, this doesn’t seem quite fruitful for me and there’s a probable chance of damaging the processor.
Fix High CPU Usage

Check your Task Manager to see if the processor utilization has reached a high percentage. Just understand that 100% CPU usage ultimately leads to overheating.
In such a scenario, there’s usually one process that consumes the maximum resource. Ending its task is always the best option, if you’re not utilizing it at the moment.
However, some might be essential to run in the background at all times. That said, you could identify what’s causing this problem and proceed to fix it instead of ending it.
Here’s a detailed guide to help you lower CPU usage. And, if a specific process is the culprit, search for the relevant guide here.
Running Malware Scans

Unlike resource-hungry apps and processes, viruses do not appear in Task Manager. Yet, they keep running in the background significantly affecting CPU performance.
Running regular malware scans is a healthy habit. I prefer the built-in Windows feature (Virus and threat protection). You can go for one or more third-party anti-virus software too.
Some even suggest reducing the number of browser tabs, using fewer applications when multitasking, or limiting FPS from in-game settings. That’s probably not what you seek for.
But if an application is malicious (leading to high CPU usage), it’s better to uninstall/reinstall it.
Manage Power-related Settings

Windows offers a dedicated power management option to control the processor state. Reducing it can help lower the CPU overheating issue to some extent.
Navigate to Control Panel > System and Security > Power Options > Change Plan Settings > Change Advanced Power Settings. Expand Processor power management and start lowering the Minimum processor state option.
Also, you can decrease the Maximum processor state value. I like to test this by reducing it by 5% each time.
You may tweak the System Cooling Policy option to indirectly lower the temperature. What I mean here is setting it to Passive. This slows down the processor and with that, heat reduction is also somewhat reduced.
Additional Tips:
- When playing games, always opt for a dedicated GPU over the CPU’s integrated graphics. This handles the graphically-intensive tasks much better.
- I also recommend enabling hardware acceleration. This will shift some intensive tasks from the CPU to other components (mostly, the graphics card). It should help lower the usage as well as the temperature.