Tech News Today
  • Hardware
    • Motherboards
    • CPUs
    • Graphic Cards
    • RAM
    • SSDs
    • Computer Cases
    • Monitors
    • Peripherals
    • Power Supply Unit
    • PC Builds
    • Computer Tips
  • Software
  • Operating System
    • Windows
    • Mac
    • Linux
  • Gaming
  • Mobile
  • Console
  • More
    • Internet
    • Networking
    • Security
    • Buyer’s Guide
    • Gadgets
    • Laptops
    • Reviews
    • How To
    • News
Facebook Twitter Instagram
Tech News Today
  • Hardware
    • Motherboards
    • CPUs
    • Graphic Cards
    • RAM
    • SSDs
    • Computer Cases
    • Monitors
    • Peripherals
    • Power Supply Unit
    • PC Builds
    • Computer Tips
  • Software
  • Operating System
    • Windows
    • Mac
    • Linux
  • Gaming
  • Mobile
  • Console
  • More
    • Internet
    • Networking
    • Security
    • Buyer’s Guide
    • Gadgets
    • Laptops
    • Reviews
    • How To
    • News
Tech News Today
Home»How To»How To Hide Or Remove Recycle Bin From Desktop On Windows 11

How To Hide Or Remove Recycle Bin From Desktop On Windows 11

Anup ThapaBy Anup ThapaDecember 18, 2022
remove recycle bin from desktop windows 11

The Recycle Bin often contains sensitive files that aren’t meant to be seen by unauthorized eyes. In a public setting such as a school or workplace, the Recycle Bin icon on the desktop can easily lead to such an invasion of your privacy.

Even if you do regularly empty the Recycle Bin, the plethora of icons on Windows 11 can give off a cluttered feel. So, from an aesthetic point of view, removing the Recycle Bin may be the way to go for a cleaner look.

The first two methods are easy to follow and will suffice for most users, but in case they don’t work, you can always remove the recycle bin via the Group Policy Editor or Registry Editor.

Table of Contents

  • Remove via Personalization Settings
  • Turn Off Show Desktop Icons
  • Modify Group Policy
  • Modify Registry Values

Remove via Personalization Settings

The personalization settings, as the name suggests, help you customize how your desktop looks and feels according to your preferences. You can customize the icons or remove them. We’ve listed the steps to do so for the Recycle Bin below:

  1. Press Win + R, type desk.cpl ,,5 and press Enter.
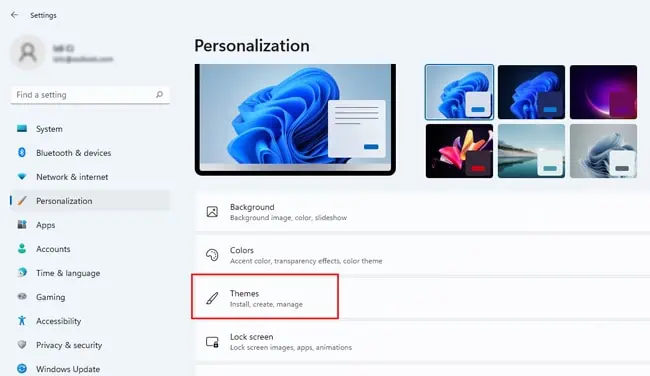
  2. Alternatively, you can also right-click on the desktop and select Personalize or manually go to Settings > Personalization > Themes.
    personalization-themes-windows-11
  3. In the Related Settings section, click on the Desktop Icon Settings option.
    windows-11-desktop-icon-settings
  4. Uncheck the Recycle Bin option and press OK to apply the changes.
    desktop icon settings recycle bin

Turn Off Show Desktop Icons

You can also disable the Show Desktop Icons option to remove the Recycle Bin from the desktop. The caveat with this is that it hides all the icons from your desktop, not just the Recycle Bin. Nonetheless, there are scenarios where this method is useful, so here are the necessary steps:

  1. Right-click on the desktop and select View.
  2. Toggle the Show Desktop Icons OFF to hide the recycle bin along with everything else.
    show-desktop-icons

Modify Group Policy

The Group Policy Editor allows users to modify various important settings and policies. In this case, specifically, you can use it to remove most occurrences of the Recycle Bin icon. Here are the steps to do so:

Note: The Local Group Policy Editor is not accessible by default on Windows 11 Home Edition. So, users on that OS version can either enable the editor manually or use the Registry method from the section below.
  1. Press Win + R, type gpedit.msc, and press Enter.
  2. Navigate to: User Configuration > Administrative Templates > Desktop
  3. Double-click the Remove Recycle Bin icon from desktop policy.
    remove-recycle-bin-icon-from-desktop-policy
  4. Enable it and press OK to save the changes.
    remove-recycle-bin-icon-from-desktop
  5. Restart your PC. Upon rebooting, the Recycle Bin icon should be removed from the desktop.

Modify Registry Values

You can use a Shell Object’s Folder ID, i.e., GUID, to create a value in the HideDesktopIcons key. As you probably guessed, this hides its icon from the desktop. We highly recommend backing up the registry before proceeding with the steps listed below:

  1. Press Win + R, type regedit, and press Enter.
  2. Navigate to: Computer\HKEY_LOCAL_MACHINE \Software\Microsoft\Windows\CurrentVersion\Explorer\HideDesktopIcons\
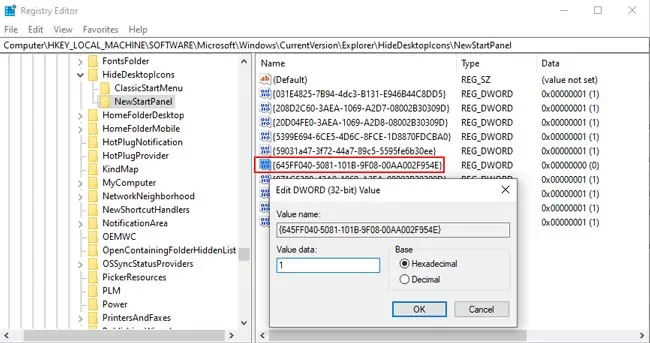
  3. Right-click the NewStartPanel key and select New > DWORD Value.
    new-start-panel
  4. Enter {645FF040-5081-101B-9F08-00AA002F954E} as the name.
  5. Double-click the GUID from the previous step, enter 1 in the Value Data field, and press OK.
    newstartpanel-recycle-bin
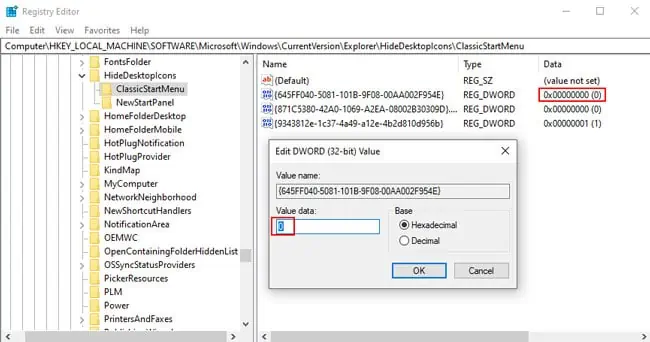
  6. Right-click the ClassicStartMenu key and select New > DWORD Value.
  7. Repeat Steps 4 – 5. The Recycle Bin should no longer be present on your desktop.
  8. To bring the Recycle Bin icon back, set the GUID’s Value Data from Steps 5 and 7 to 0.
    classic-start-menu
how-to
Anup Thapa
  • LinkedIn

Anup Thapa is a tech writer at TechNewsToday. He mostly writes informative articles, tutorials, and troubleshooting guides related to Windows systems, networking, and computer hardware. Anup has been writing professionally for almost 5 years, and tinkering with PCs for much longer. His love for all things tech started when he got his first PC over 15 years ago. It was a Pentium IV system running Windows XP on a single 256 MB stick. He spent his formative years glued to this PC, troubleshooting any hardware or software problems he encountered by himself. Professionally, Anup has had brief forays into a variety of fields like coding, hardware installation, writing, etc. In doing so, he's worked with people of different backgrounds and skill levels, from average joes to industry leaders and experts. This has given him not just a versatile skillset, but also a unique perspective for writing that enables him to concisely communicate complex information and solve his reader's problems efficiently. You can contact him at anup@technewstoday.com

Related Posts

facetime-call-history

How to Check FaceTime Call History

January 2, 2023
iphone-touch-screen-not-working

iPhone Touchscreen Not Working? Try These 6 Fixes

December 27, 2022
Change the orientation 1

How To Change Screen Orientation on Windows

December 7, 2022
how to pair bluetooth headphones

How to Pair Bluetooth Headphones

October 20, 2022
update hdmi driver

How To Update HDMI Driver on Windows

August 29, 2022
netflix-download-not-working

Netflix Download Not Working – Why & How to Fix It

August 13, 2022
Add A Comment

Leave A Reply Cancel Reply

Latest Posts
Memory-Compression

What is Memory Compression in Windows? Should You Enable or Disable It

March 1, 2023
dism-vs-sfc-vs-chdsk

DISM, SFC, CHKDSK: What’s the Difference

February 28, 2023
bios-settings-for-gaming

Best BIOS Settings for Gaming

February 16, 2023
You may also like
how-to-clean-hp-printer-rollers

How to Clean HP Printer Rollers

March 3, 2023
keyboard input lag

9 Ways to Fix Keyboard Input Lag

March 3, 2023
keyboard key is stuck

How to Fix a Stuck Key on a Keyboard

March 3, 2023
Recommended
Cookie Clicker Garden Guide

Cookie Clicker Garden Guide to Unlocking Every Seed

September 26, 2021
monitor no signal

Computer Turns On But Monitor Says No Signal (9 Ways To Fix)

November 10, 2022
Facebook Twitter Pinterest
  • Home
  • About Us
  • Our Team
  • Editorial Guidelines
  • Privacy Policy
  • Affiliate Disclosure
© 2023 TechNewsToday, editor@technewstoday.com | Tech Central Pvt. Ltd.

Type above and press Enter to search. Press Esc to cancel.