Before the introduction of G-Sync or FreeSync, users could only use VSync to synchronize the monitor’s refresh rate. However, VSync is notorious for increasing lags and affecting system performance.
Using G-Sync with NVIDIA G-sync-approved monitors is the best way to synchronize your refresh rates. It takes care of screen tears and smoothens your gameplay while reducing input lag.
So we have created this article to help you correctly set up G-Sync on your PC.
How to Enable G-Sync
Here is the step-by-step guide on enabling G-Sync on your computer.
Check Monitor and GPU Specification
Not all monitors and GPU devices support G-Sync. As far as the GPU is concerned, you need at least a 600-series NVIDIA display adapter.
Also, your monitors need to have a built-in G-Sync chip to get the full experience of this feature. You can still get limited support for this feature on G-Sync Compatible (FreeSync) monitors.
Another thing you should know is you can only use G-Sync with Monitors connected using DisplayPorts or Mini-DisplayPorts, not HDMI, VGA, or DVI. You need a direct DisplayPort to DisplayPort connection and can’t use any adapters.
To find a G-Sync or G-Sync Compatible monitor, you should visit the NVIDIA G-Sync Monitors webpage.
Enable G-Sync on Monitor
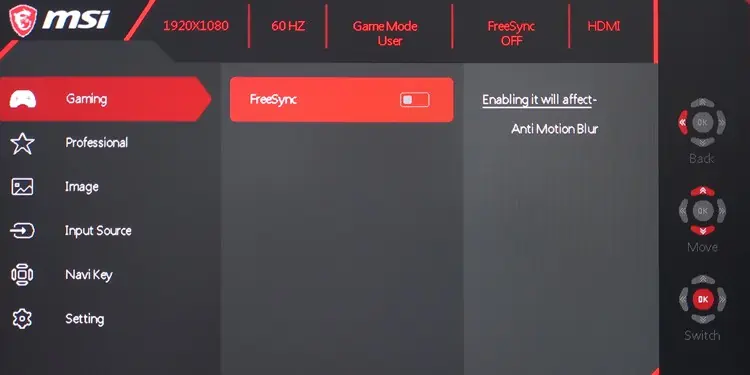
You need to enable G-Sync or FreeSync on your monitor before doing the same on your PC. Here’s how you can do so:
- Press the menu button on the back or sides of your monitor.
- Navigate the menu to search and enable G-Sync or FreeSync. You’ll usually find the option under Gaming.

If you have trouble finding the option or accessing the monitor menu, seek help from the manufacturer’s website.
Enable G-Sync on PC
The next step is to enable G-Sync on your computer through the NVIDIA Control Panel. Here are the necessary steps for the process on Windows and Linux PC:
On Windows
First, make sure to update your GPU drivers and Operating System to the latest versions. Then, follow the instructions below to set up G-Sync:
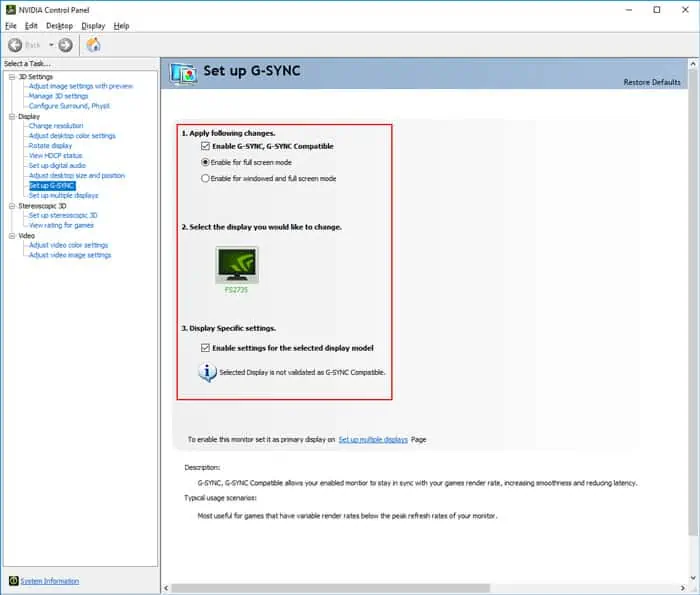
- Right-click on your Desktop and select NVIDIA Control Panel.
- Expand Display and click Set up G-Sync.
- Check Enable G-Sync/G-Sync Compatible.
- You can enable either Full-screen mode or Windowed and full screen mode.
- If you have a multiple monitor setup, you’ll see more options.
- Select your G-Sync/FreeSync Display and check Enable settings for the selected display model.

- Hit Apply.
- Now, go to 3D-Settings > Manage 3D Settings.
- On the Global Settings tab, set Monitor Technology to G-Sync/G-Sync Compatible.
- Click Apply again.
You need to set the G-Sync monitor as the primary display if you use multiple screens. To do so,
- On the NVIDIA Control panel, go to Display > Set up multiple displays.
- Drag the screens to match your physical display setup.
- To identify the screen for your monitor, right-click on the icon and select Identify.
- Right-click on the G-Sync/FreeSync screen and select Make Primary.
- Click Apply.
On Linux
Here are the steps to enable G-Sync on a Linux PC:
- Open the Terminal and enter
sudo nvidia-settings. - Go to X server display configuration > Advanced.
- Tick Allow G-Sync on monitor not validated as G-Sync Compatible.
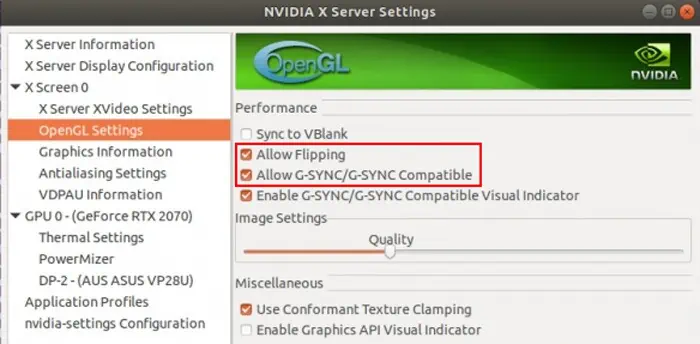
- Go to OpenGL settings and enable the following options:
- Allow Flipping
- Allow G-Sync/G-Sync Compatible

- You can also enable the options below to make sure G-Sync is working:
- Enable G-Sync/G-Sync Compatible Visual Indicator
- Enable Graphics API Visual Indicator
Linux shows some issues with G-Sync, such as:
- G-Sync doesn’t work with Force Full Composition Pipeline or Force. But Force Full Composition Pipeline is necessary to avoid screen tearing on Desktop.
- Xorg display server doesn’t support multiple monitor display with G-Sync, while Wayland has unstable support. So, it’s best to disable other monitors except for the primary one while playing games with G-Sync.
- You also can’t use G-Sync together with a compositor, such as Picom or Compton.
- Most games don’t support Windowed mode with G-Sync.
So, we recommend using Lustris to play your games on Linux. You can add pre-launch and post-exit scripts to enable/disable the necessary options while starting and exiting a game.

An example for the pre-launch script is:
#!/bin/bash

# Disable Force Full Composition Pipeline
nvidia-settings -a CurrentMetaMode="nvidia-auto-select +0+0 { ForceFullCompositionPipeline=Off }"

# Disable Compositor
pkill picom
#This is the code to disable the picom compositor. Replace it with the code to disable the compositor on your system

#Disable Other Screens
xrandr --output HDMI-0 --off --output DP-0 --off
#This code disables monitors connected to HDMI-0 and DisplayPort-0
Similarly, for the post-exit script:
#!/bin/bash

#Re-enable Other Screens
xrandr --output HDMI-0 --auto --output DP-0 --auto
#This code enables monitors connected to HDMI-0 and DisplayPort-0

# Enable Force Full Composition Pipeline
nvidia-settings -a CurrentMetaMode="nvidia-auto-select +0+0 { ForceFullCompositionPipeline=On }"

# Enable Compositor
picom -f --config ~/.config/picom/picom.conf --experimental-backends &
#This is the code to enable the picom compositor. Replace it with the code to disable the compositor on your system
Modify these codes according to your system and save as .sh files. Then, add them to the corresponding Lustris menu.
You can also disable compositing for full-screen windows for most compositors instead of disabling and enabling it every time.
Customize Display Settings
We recommend customizing specific options on your NVIDIA or Game Settings to get the most out of G-Sync, such as:
- Refresh Rate: Set to Variable or the highest on your monitor and use the same value on tour System and Application Settings.
- Frame Rate Cap (With Variable): Use a value slightly lower than the max refresh rate of the monitor. For example, with a 144Hz Monitor, set Frame Rate Cap to 140 or 141. You can set this value on your game settings or NVIDIA Control Panel.
- VSync: Enabling VSync on NVIDIA Control Panel is the best option for preventing stuttering and tearing. Most users recommend turning it off in the games.
Troubleshooting Issues With G-Sync
The first thing you should do is to go through the steps in the above section and make sure you have done everything properly.
Cross-check your monitor specs as well as every option you should enable or disable. If you still encounter any issues, apply the possible solutions below:
Update Graphics Drivers and OS
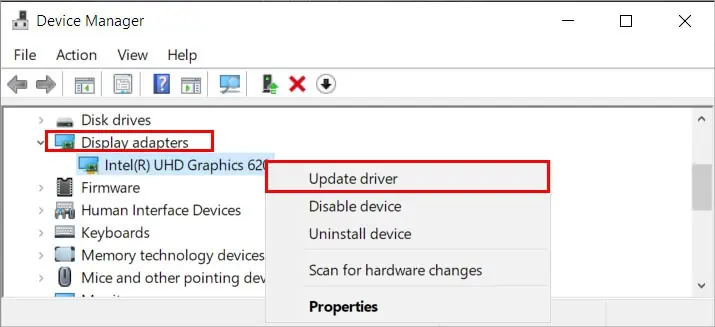
Outdated or buggy drivers and OS are often responsible for conflicts with peripherals. We recommend updating your OS and GPU drivers to the latest versions to avoid such issues. Here’s how you can update your graphics drivers:
- Open Run (Win + R) and enter
devmgmt.msc. - Expand Display adapters and right-click on your GPU device.
- Select Update driver and then Search automatically for drivers.

You can also uninstall the NVIDIA driver using the Display Driver Uninstaller (DDU) and install the latest version from the official website.
Enable VSync
You don’t need to enable VSync with G-Sync and G-Sync Ultimate computers. But G-Sync Compatible monitors can show screen tears on some Games even after enabling G-Sync.
In such cases, you need to enable VSync for the games. To do so,
- Right-click on your Desktop and select NVIDIA Control Panel.
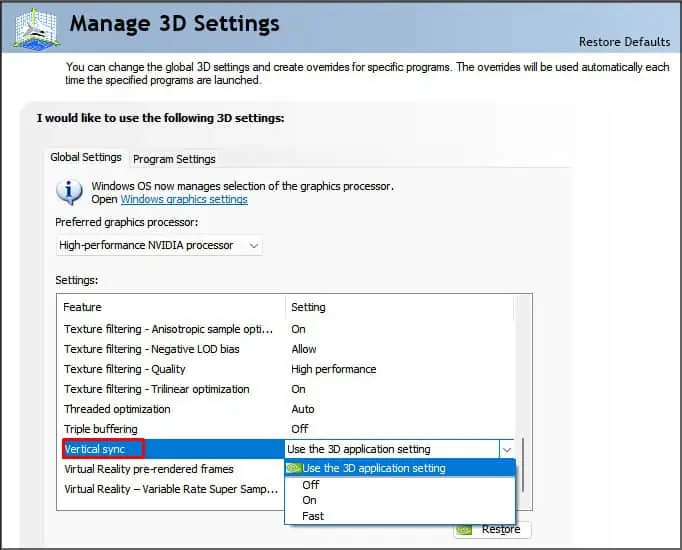
- Go to 3D-Settings > Manage 3D-settings > Program Settings.
- Select the games where you experienced tears on the drop-down box.
- Set Vertical sync to On and Max Frame Rate to a few percentages below your monitor’s refresh rate.

- Click Apply.
Check Your RAM
Defective RAMs are responsible for many system issues, including graphics and monitor errors. If you have properly set up G-Sync and executed the previous solutions, your RAM has likely gone bad.
You can run the Windows Memory Diagnostic app to check for any defects. We have a dedicated article on how you can open and use the program. So, check it out to learn the necessary steps.
Related Questions
What is the Difference Between G-Sync, G-Sync Ultimate, and G-Sync Compatible?
You might have seen G-Sync, G-Sync Ultimate, or G-Sync Compatible specifications on a monitor. They specify different G-Sync technologies with distinct features. We have a dedicated article on Gsync Ultimate vs. Gsync vs. Gsync Compatible- What’s the Difference? Check it out to learn more about the topic.
What is the Difference Between G-Sync and FreeSync?
Both G-Sync and FreeSync are adaptive synchronization technologies to synchronize the refresh rate of your system and the monitor. The difference is that G-Sync is a standard NVIDIA technology while FreeSync is an AMD technology.
So, they give the best result with their own Graphics card. But you can still use G-Sync with FreeSync monitors, albeit with a limited effect.
