
Failed updates, power surges, bad overclocking, and hardware incompatibilities can all lead to firmware corruption. Whatever the scenario, the built-in CrashFree utility on ASUS systems can help users recover it.
Along with the latest ASUS CrashFree BIOS 3, there are three other ways that have often turned out to be helpful. These include clearing CMOS, switching to backup BIOS (if your mobo supports two NVRAM chips), or updating it using the USB Flashback button.
Recently, our TechNewsToday team got the “BIOS recovery mode has been detected!” error on our three ASUS boards–PRIME B450 PLUS, ROG STRIX B550-I GAMING, and ROG ZENITH II EXTREME. As stated on the screen, we prepared a removable storage media, rebooted the system which triggered the CrashFree utility, updated the BIOS, and bam! The problem was solved.
Reset Your ASUS BIOS
Let’s begin with the most basic troubleshooting you can do. While I understand that you’re unable to get to the BIOS screen but loading the optimized defaults from the interface isn’t the only way.
Resetting BIOS settings can come in handy in situations where your BIOS got corrupted due to improper overclocking or even when the POST fails. You’re basically going to revert the firmware to its default settings, and here are the different ways to do so:
- If you have a high-end ASUS model, it could embed a Clear CMOS button. Quickly check your motherboard I/O panel to see if there’s one.

- However, some models include this button in the mainboard itself. It’s a good idea to inspect the user manual first. This way, you do not have to open up the PC case immediately.
- Wherever the button is, shut down your computer and press it for at least 10 seconds to clear the RTC RAM.
- If your ASUS motherboard doesn’t include the dedicated button, it should definitely have a CMOS battery that you can remove. Wait for about 5 minutes before reseating it.
- Most boards also embed dedicated 2-pin or 3-pin headers with CLRTC or similar indications. The idea is to short the pins using a jumper or flat-head screwdriver.
- Once you’re able to access the BIOS screen, load the optimized defaults, save changes, and finally the OS boots up.


In case you’re finding it difficult with the above steps, here’s my detailed guide on resetting ASUS BIOS.
Use Dual BIOS
After comprehensive testing at the TNT office, we can confirm that only a handful of high-end ASUS ROG boards come with dual BIOS chips–Main and Recovery.
When anything goes wrong with the primary BIOS, the secondary gets activated and flashes the factory firmware on the Main BIOS chip. While this process usually happens automatically (you need to power cycle your PC), it’s also possible to trigger it manually as well:
- After confirming that your ASUS mobo supports Dual BIOS, open the PC chassis and locate the BIOS_Switch header to identify the switch.
- Depending on the model, you require toggling the switch or simply using the dedicated button. As demonstrated below (on ASUS ROG Zenith II Extreme), all I have to do is press the button, and this switches to the recovery BIOS.
- Also, note that BIOS_LED2 will now flash instead of BIOS_LED1.
- Start your PC and the recovery process should start automatically.
- After you enter the ASUS BIOS screen, don’t forget to load the optimized defaults before exiting it.


Via ASUS CrashFree BIOS Utility
If you were planning to dump your motherboard after a failed BIOS update, what if I tell you there’s actually a way to recover it? The CrashFree BIOS utility from ASUS is an auto-recovery feature to help restore the BIOS using a backup image.
However, that doesn’t mean the recovery utility kicks in as soon as you reboot your computer. There’s a step-by-step process and you require either a flash drive or the motherboard DVD to trigger the ASUS EZ Flash.
Since you’re going to update your BIOS, make sure you won’t experience any power failure during the process. I recommend connecting your PC to a UPS or inverter (that’s exactly what we do here at the TNT office).
Check for CrashFree Support
Even though most ASUS models support this feature, it’s always a good idea to be super sure before proceeding forward. If you have a user manual, you can confirm it from there.

Another easy technique is to look up the Tech Specifications section of your model from the official ASUS website. Search “ASUS CrashFree BIOS 3” or an older version and you should find it under Special Features, as demonstrated on our PRIME B450 PLUS motherboard above.
Download the Latest BIOS Version
The second step involves downloading the latest firmware version on a working computer. Only do this from the official ASUS website. While you may use any compatible one (that’s above the current BIOS version), it’s recommended to update to the latest.
Interestingly, ASUS released the latest version (4202) for our PRIME B450 PLUS motherboard quite recently (in fact, just three days prior to writing this article). We used the same one to recover our corrupted motherboard and it worked like a charm!
- Search for your model on the official ASUS Website.
- Then, switch to the Support tab.
- Go to Driver & Utility > BIOS & FIRMWARE.
- As demonstrated below, all the other versions are collapsed. So, you’ll only see the latest version that you can proceed to download.


Prepare a USB Flash Drive
Now, insert a FAT16/32 formatted USB Flash Drive of over 1 GB capacity to copy the BIOS file here. This process is a little tricky and also might be different for all models. So, I also suggest opening the user manual while you are following along with the instructions below:
- First, unzip the downloaded folder and launch the
BIOSRenamer.exefile. - You should get a command-line screen like the one in the below snap. Here, check the name it’s going to be renamed to (in our case, it’s
PB450PS.CAP). - While this should match the one on your user manual, I still recommend comparing it to be on the safe side.
- Close the BIOSRenamer utility and get back to the folder. Send the newly renamed CAP file to your flash drive.


Note: If you’re using the DVD that comes packaged with your motherboard, you do not require a USB flash drive at all. Just insert it into the optical drive and proceed with the following steps. But do note that this will only help you reflash the factory BIOS version.
Trigger EZ Flash 3
Next, insert the flash drive/motherboard’s DVD on your ASUS PC. For the former, make sure you’re using the motherboard’s I/O port instead of the front panel USBs. Start/restart the system and the CrashFree utility will automatically take you to the EZ Flash screen.

If you get the ‘Warning! BIOS Recovery mode has been detected!’, as with our case in PRIME B450 PLUS, wait for a moment (as indicated on the screen).
But if you’re using the motherboard DVD, you’ll require pressing the Ctrl + Alt + Del key to get to the EZ Flash Utility window.
Start the Update
Caution: Do not power down your system when the update is in progress. You’ll relate to this if you had a previous BIOS update interrupted or failed.
Once you’re in the ASUS EZ Flash window, it’s time to start the ASUS BIOS update:
- Look for the
.CAPfile and select it. - In the ‘Do you want to read this file?’ confirmation prompt, hit Yes to continue.
- You’ll again be asked for final confirmation (this time with the detailed BIOS information that it will flash to). Hit Yes to continue.
- Keep track of the progress bar at the bottom.
- Now, you just require to wait for about 5 to 8 minutes to complete. However, this depends on the size of the update. In our case, it was completed in under 5 minutes.
- After the update is complete, you’ll get a prompt with the message, “Update successful! System will be reset!”. You may press Ok or just wait for a few seconds and it will automatically reboot. It happened so fast that we were unable to take a snap of it.


Load Optimized Defaults
Finally, you need to load the factory settings to ensure the latest version is stable and compatible with your ASUS PC:
- Press the dedicated key to enter the ASUS BIOS Settings page.
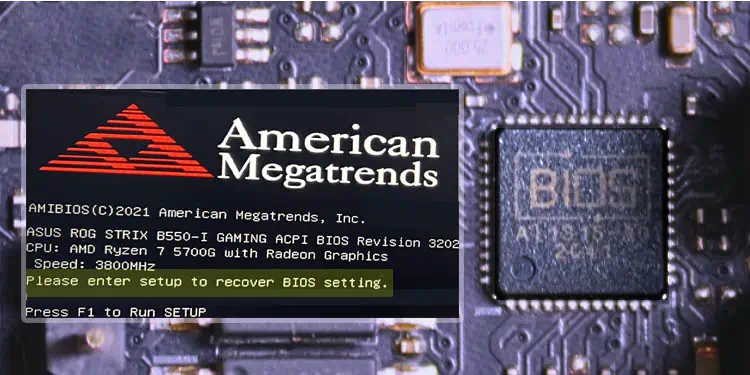
In our case, we encountered the AMI screen after fixing the corrupted BIOS. If the same thing happened to you, hit F1 to run the setup. - Once you’re on the BIOS interface, check the new BIOS version. See how we were successful:
- Then, hit F5 or choose Default from the bottom part of the screen.
- In the Load Optimized Defaults prompt, press Ok. This will reset the ASUS BIOS.
- Finally, hit F10 to save the changes and this should reboot your computer.


Use USB BIOS Flashback Button
One of the most convenient ways to reflash your ASUS BIOS is using the dedicated USB flashback button. In case the CrashFree BIOS recovery feature didn’t work for you, this is the last sort method.
That’s exactly what we did on our ROG STRIX B550-I GAMING motherboard and it helped us fix the system. While in most systems, updating the motherboard is possible without the processor, in our case, we had to install the CPU in order for it to enable. So, it’s always best to refer to the user manual first before proceeding forward.
Caution: Do not turn off your ASUS PC, unplug the flash drive, or try clearing CMOS when the update is in progress. This may damage your board completely.
- First, inspect the dedicated USB BIOS Flashback button and port on your ASUS motherboard’s I/O panel.
- Prepare a USB flash drive containing just the latest
BIOS.CAPfile for your model. The involved steps are exactly the same as I demonstrated above for triggering the CrashFree BIOS utility. - Insert the USB drive into the dedicated BIOS Flashback port.
- Then, press the BIOS Flashback button for about 3 seconds and you’ll see the LED light flash.
- What we noticed was–during the first few blinks, it was a bit slow and for the rest of the process, the LED flashed rapidly.
- Also, if you have connected your PC to the monitor, you’ll notice the “BIOS is updating LED firmware” message on the screen, as shown below.
- Wait for the light to stop blinking. While ASUS recommends waiting for 8 minutes, this may vary depending on the BIOS version file size. In our case, it was completed under 5 minutes.
- Reassemble all the components (if required) and start your PC.
- You’ll likely meet with the American Megatrends screen. Press F1 to continue.
- Once you enter the BIOS Setup screen, check the new version and load the optimized defaults as discussed earlier.


