
For general users, engaging with BIOS settings isn’t something you do every day. But when you encounter error messages after POST or your system becomes unstable following the installation of new components, you’ll have to address these issues on your ASUS firmware interface.
Even though the BIOS appearance in ROG, TUF GAMING, PRIME, ProArt, and other series differ slightly, the available options remain identical. You can make changes from basic to advanced settings, like boot/storage management, power configuration, processor/memory overclocking, and more.
Catering to your needs, I’ve compiled a detailed guide that covers all the essential settings when setting up ASUS BIOS for the first time.
Basic BIOS Configuration
Let’s begin the setup by examining and tweaking the most basic settings first. This section covers everything you should know about the latest UEFI interface, changing setup modes, monitoring hardware/BIOS information, tweaking date/time/language, and more.
Getting to BIOS

The easiest method involves starting/restarting your computer and spamming the Del or F2 key (depending on the model). In some, both should work.
In case that doesn’t work, you can check out our detailed article on entering asus bios.
Switching Between EZ and Advanced Modes

After entering BIOS, you’ll either end up in the EZ or Advanced mode. Quickly check this next to the ASUS/TUF/ROG logo.
As the name suggests, EZ lets you easily view the system information and tweak the most basic settings. But if you’re going for more sophisticated options for better configuration of your ASUS system, use F7 to quickly switch to Advanced mode.
By default, most ASUS systems will start the EZ mode after the POST is completed. However, you can permanently change this from Boot > Setup Mode.
Retrieving BIOS Information

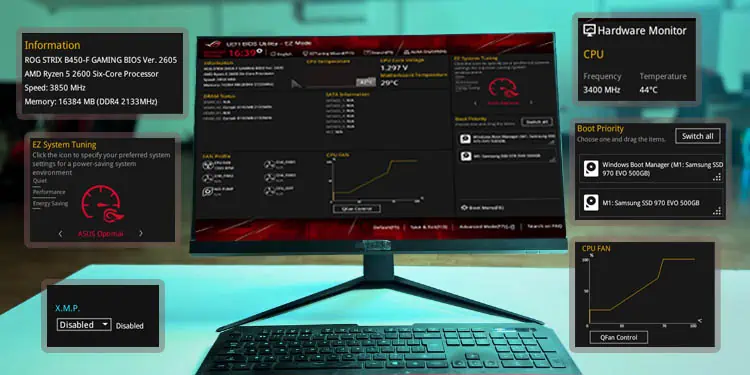
Oftentimes, we need to know specific information about our BIOS and even the connected components. These may include the motherboard’s model, installed CPU, BIOS version, SATA/M.2 information, DRAM status, etc.
In EZ mode, you can look up the dedicated sections (as demonstrated in the figure) to retrieve the details. On the other hand, the DRAM and SATA status gives you a clear idea of which slots/headers your components are connected to.
Users in Advanced Mode can even get a detailed overview of their BIOS and Processor information in the Main menu.
Hardware Monitoring
To ensure all your system components are working optimally, you can get a quick insight from the BIOS settings itself
When you’re in the UEFI utility, your PC shouldn’t consume high system resources. It should possibly be running at the lowest possible temperature and voltage. But if you notice an overheating problem, you’ll know that there’s something wrong with the CPU or the cooler.

In EZ Mode, you can quickly examine the CPU/motherboard temperature along with the CPU Core Voltage alongside the Information section. To verify that your fans are running at appropriate RPMs, check the FAN Profile section at the bottom.
If you’re on Advanced Mode, just check the right pane, which is dedicated to Hardware Monitor. You can even get in-depth temperature and voltage values of your components from the Monitor menu.
Tweaking Date, Time, and Language
By default, the system language should be set to English. ASUS offers at least nine different languages on most of its boards. So, it’s quite understandable that you want to switch to your mother tongue (if it’s available).
You can do it from the Language icon above the menu bar. Also, it’s possible from Advanced Mode > Main > System Language.

While both the date and time should be automatically adjusted, problems with the CMOS can affect them. If you do not wish to reset your BIOS, it’s better to change the settings manually–but this can be a little tricky.
The dedicated System Date and System Time fields that you find below System Language can’t be tweaked. Instead, you have to click on the settings icon in the top-left corner of the UEFI BIOS Utility.
Saving BIOS Settings
A common mistake I’ve seen with beginners is that they apply the BIOS settings but forget to save the changes made. Just pressing Esc to exit the BIOS mode won’t do.

You need to go to Exit > Save Changes and Reset. A dialogue box should appear where all the tweaked settings should be listed. Verify each one before pressing Ok. Once that’s done, your computer should restart with the newly configured BIOS settings.
Additional Tip: I have noticed that changes made in EZ mode won’t be saved. In that case, try switching the setup mode to Advanced and come back to EZ. Try saving the applied changes and this time, it should work.
Loading Optimized Defaults
In case you encounter any system instability after tweaking any ASUS BIOS settings, you can load the factory values without needing to clear CMOS.

Just look for the Default option in the bottom section or directly press F5. A confirmation prompt should pop up. Click the Ok button and save the changes. After your PC restarts, all the configured BIOS values will be set to factory defaults.
Boot and Storage Configuration
The next thing to look up on your BIOS Settings page is boot and storage-related settings. These include boot order management, secure boot option, fast boot, SATA/NVMe configuration, and more.
Managing Boot Priority

For users with multiple boot drives, switching between them every time during the startup can be a little tedious. Nonetheless, ASUS BIOS offers the easiest way to change the boot order. Once done, your system will automatically select the drive at the top of the priority list.
In EZ mode, navigate to the Boot Priority section on the right and manually drag your storage devices.
But if you’re willing to do it in the Advanced mode, get to the Boot Option Priorities section and manage the options accordingly.
CSM for Legacy Support

If you have installed an MBR-partitioned hard drive, the ASUS UEFI BIOS will not recognize it. This is because it stores its data in an EFI file partition. That’s the reason you won’t see it listed under the Boot Priority section.
In order to make use of such drives and proceed with the installation of older operating systems, you need to add legacy compatibility.
Fortunately, you can activate the feature called Compatibility Support Module (CSM) from the Boot tab. Once you’re here, expand the Launch CSM drop-down and set it to Enabled. Do note that this feature will disable certain UEFI security features.
If you’re unable to use CSM (greyed-out), try disabling Secure Boot. That was exactly how I was able to solve my issue when trying to install Windows XP on my NX580VD laptop.
Enabling or Disabling Secure Boot

As stated above, you might require disabling Secure Boot in order to gain control over CSM. Also, you’ll have to consider turning this option off if you’re using certain incompatible hardware components.
While these are only in rare cases, I rather recommend enabling the feature as it protects your ASUS system from malicious software when starting up. Additionally, it has to be turned on (alongside TPM 2.0) if you’re going to install Windows 11.
To access Secure Boot, switch to Advanced Mode. In some laptops, it’s available in Security > Secure Boot Control.
In case you don’t find it there, navigate to the Boot tab and search for the related option. Expand the OS Type and pick Windows UEFI Mode.
Configuring Fast Boot

You might have noticed that modern systems take less time to boot up. While this is partly due to Windows Fast Startup, even the related Fast Boot setting on ASUS BIOS has an equal contribution.
Whether you wish to speed up the boot time or want to deactivate it (which gives you sufficient time to access the BIOS utility), you can do it from the Boot tab in Advanced mode.
In some ASUS boards, you’ll have to enter the Boot Configuration section (as in my case with PRIME B450 Plus).
SATA Configuration

Most primary storage devices we use today are either SATA or NVMe. When you connect your drives to the dedicated headers on the motherboard, they should be automatically detected. But you can manually disable it using the SATA Port Enable option in ASUS BIOS.
In this dedicated section, you can even set the SATA configuration mode to AHCI (Advanced Host Controller Interface) and RAID (Redundant Arrays of Independent Disks).
Likewise, the NVMe RAID mode and SMART Self-Test (a monitoring tool that shows an error message during POST if it finds any issues with your HDD/SSD) can also be tweaked here.
Security Options
When it comes to protecting your ASUS system, the manufacturer offers two vital features–BIOS Password and TPM (Trusted Platform Module). Let me walk you through the basic steps to configure each of these options.
Setting BIOS Password

If your system is accessed by multiple users, you definitely wouldn’t want outsiders to tinker with your BIOS settings. In that case, setting up a password is the best choice, which even I have implemented on all of my ASUS boards.
Navigate to the Main tab and select Security. Here, you should find two options–Administrator Password and User Password. While the former limits the users from accessing the BIOS Setup screen, the latter will even prevent them from even booting up.
Note: In case you have forgotten your BIOS password, the only possible way to reset this is by clearing the RTC RAM (which clears the CMOS).
TPM
As mentioned earlier, you’re required to enable TPM 2.0 to complete the Windows 11 installation. This cryptographic feature is meant to protect your digital assets and is absolutely essential to run the security features like Windows Hello, BitLocker Encryption, face recognition, fingerprint protection, and more.
Even though most modern ASUS motherboards support TPM, it’s not likely enabled by default. The process is quite straightforward but does vary depending on the processor installed.

In AMD boards (as demonstrated on my PRIME B450 PLUS), get to the Advanced tab > AMD fTPM configuration > AMD fTPM Switch. Set this to Enabled, save the settings, and you’re good to go!
On the flip side, Intel users should look for PCH-FW Configuration (in the Advanced tab as well). Then, set the PTT option to Enable.
Advanced BIOS Configuration
Now that I have covered the basic BIOS settings and security features, it’s time to focus on some advanced ones. While there are a plethora of options available, here I’ll be guiding you through the most common and essential ones.
Virtualization

Before being able to run virtualization platforms on your operating system, it’s essential that you ensure the related option is enabled on your ASUS BIOS. So, that’s exactly the solution if you’re getting errors like AMD-V or VT-x is disabled.
First, navigate to Advanced > CPU Configuration. Here, Intel users can look for VMX, Intel Virtualization Technology. VT-d, or similar options. On the other hand, Team Red should tweak SVM Mode to enable AMD-V.
Integrated Graphics

If you have installed a processor with integrated graphics, it’s a good idea to enable this feature in order to use your mobo’s video ports even when a discrete graphics card is installed.
However, there can be times when it might conflict with some applications and games. In such a case, it’s best to disable it and you should be able to set them to use a dedicated GPU instead of integrated.
ASUS motherboards with Intel Core processors can find iGPU Multi-Monitor in Advanced > System Agent (SA) Configuration > Graphics Configuration.
On the flip side, AMD Ryzen users should find the IGFX Multi-Monitor in Advanced > NB Configuration.
Power Management

To control sleep and hibernate options in ASUS BIOS, you can navigate to Advanced > APM Configuration. The available options can vary based on the ASUS model you’re using. Here are some of the important settings you can try out:
- ErP Ready: You can set this to a combination of full shutdown (S5) and hibernation (S4) or simply S5.
- Restore on AC Power Loss: This option allows you to set a related mode when there’s unexpected power loss. You can either make your PC start or keep it powered down. Also, you may opt for the last saved configuration.
- Power on PCI-E/PCI: By default, the feature should be disabled on ASUS BIOS. You can turn it on and this should enable Wake-On-LAN.
Overclocking Your ASUS System
For testing purposes, our TNT Hardware Department utilized different ASUS motherboards to overclock multiple Pinnacle Ridge, Cezane, and Alder Lake processors. We tried EZ System Tuning, EZ Tuning Wizard, and even did a manual overclock. We were successful to squeeze out additional 200 MHz than the specified maximum frequency.
Let me guide you through different options you can navigate in order to overclock the CPU yourself. Also, this section will guide you with the possible ways of pushing the RAM frequency beyond its JEDEC specification.
Caution: Overclocking your system components may lead to system instability and can even damage them in the long run. Having said that, kindly proceed with the below instructions at your own risk!
EZ Tuning Methods

If you do not want to hassle with the voltage, temperature, and frequency manually, you can directly perform overclocking on ASUS using EZ System Tuning. You should find this option in the top-right corner of the EZ Mode screen.
Some ROG mobos even support EZ Tuning Wizard, which fine-tunes the clock speeds through automatic system inspection and also lets you configure RAID. Open this from above the menu bar or simply use F11 to trigger it.
Also, similar options are available in the Advanced mode. Look for OC Tuner, TPU, Core Performance Boost, and similar options on the Ai Tweaker page.
XMP and DOCP

Enabling the memory profile is the first thing I do after installing new RAM. This allows me to gain the advertised frequency, which otherwise would be running at the JEDEC specification.
Since XMP (eXtreme Memory Profile) is an Intel technology, AMD has introduced its own version called DOCP (Direct Overclock Profile) for ASUS mobos. Whatever the option, you’ll be able to run your RAM sticks at the rated speed.
All you have to do is select a profile (the first one recommended) from the dedicated section (in EZ mode) or the Ai Tweaker > Ai Overclock Tuner (in Advanced mode).
Manual Overclocking Using Ai Tweaker
Whether you want to boost your CPU or RAM clock speed manually, all these options are available under the Ai Tweaker tab.
When overclocking the processor, look for the CPU Core Ratio and start dialing up the values in small increments (say, 1). While in most ASUS BIOS, it’s even possible to change the BCLK value, I recommend not playing with it as it can affect other components as well (especially in the case of older boards).

After that, you need to save the setting, try booting into Windows, and perform a stress test for each increment. In case you weren’t able to boot up or the test failed, it’s better to try with a slightly lower value.
Now, you can manually try incrementing the CPU Core Voltage in small increments of 0.05. Keep dialing up the voltage along with the Core Multiplier to find the highest stable value. Also, you can try other voltage parameters for better OC control, which includes CPU/SOC Load-Line Calibration, Performance Enhancement, VDDCR controls, etc.

For overclocking the memory modules, you’ll need to manage the timings and voltage yourself. In ASUS BIOS, you should find the dedicated section called DRAM Timing Control, where you should find all the related parameters (DRAM CAS# Latency, Trcdrd, Trcdwr, RAS# Pre Time, RAS# ACT Time, and more).
AI Overclocking
With the latest ASUS AI Overclocking (AIOC), manually balancing frequency and voltage is slowly fading away. However, it has only been launched on a few high-end Intel models (from Z and X series).
If you have a compatible motherboard, all you have to do is set the AI Overclock Tuner to Manual and pick AI Optimized in CPU Core Ratio. You can now check the voltage and frequency predictions from the dedicated section on the right pane.
Also, note that ASUS has introduced AI Cooling, Networking, and Two-way Noise Cancellation features. While their options can’t be tweaked on BIOS, you can utilize the AI Suite 3 application to make changes (but only on supported motherboards).
Customization
While AI is the major highlight of ASUS BIOS, it’s also worth mentioning their top-notch customization features. Among the various options available (may differ on TUF/PRIME/ROG boards), this section guides you through the general steps on fan control, My Favorites, and Quick Search tabs.
Fan Control

To control your loud fans or make them run at the desired RPMs, ASUS offers both auto-tuned and custom fan control on their BIOS Utility.
In EZ mode, select the QFan Control option and make desirable changes (by setting pre-configured profiles) to all those connected to the motherboard. These include CPU, case, and even liquid-cooling pumps. It’s also worth noting that ASUS offers Q-Fan Tuning and customizing fan speed curves in the same section.
To control your fans in the Advanced Mode, navigate to Monitor > Q-Fan Configuration. Here, the options are similar but in addition to that, you get to configure other features like smoothing up/down time, lower speed limits, temperature, and duty cycle.
Setting Up My Favorites
One thing that I love about ASUS BIOS is it allows us to keep tabs on those settings that are in regular use. While the dedicated section is available in the Advanced mode, you need to open up Setup Tree Map to add/remove these items. Check my demonstration below on ROG STRIX B450-F GAMING to learn how to do it:
- Start by pressing F3 or clicking the My Favorite option (present above the menu bar).

- Once you’re in the Setup Tree Map window, remove the unnecessary items from the Shortcut Pane (on the right). You can also delist everything using the Delete All button.
- Now, select any menu from the left pane.
- All the configurable items from the selected menu will now be listed in the middle pane. You may choose the Expand All option to get into more details.
- Hover your mouse cursor on the setting you like to add in the My Favorite section. Click on the ‘+’ icon and the options should be shifted to the right pane.


Quick Search Option
On most ASUS mobos, you can quickly search for a related setting using the Quick Search feature. Press F9 to launch it. Now, enter the desired keyword in the search box and hit Ok.

For instance, when I search for ‘TPM’, all the related settings will now be listed below, making it much easier for me to tweak it.
Updating & Recovering ASUS BIOS
For normal users, updating BIOS is not something to worry about and it’s fine that way. But if you encounter system instabilities (especially after installing a new hardware component) or face NO BOOT issues (often due to bugs), flashing the latest version can prove to be an effective solution.
Note that power interruption when upgrading the BIOS version can completely brick your motherboard. If your model supports dual BIOS, it should automatically switch to the backup one and flash the factory version to the main chip. But if it doesn’t, you should still be able to recover using the ASUS CrashFree utility.
EZ Flash Utility
In order to update your motherboard firmware to the latest version, ASUS offers the EZ Flash Utility (the latest one is version 3). You can find this option under the Tool tab in Advanced mode.
Prior to starting the update, it’s essential that you prepare a USB flash drive containing a compatible BIOS version. Only then the file will be displayed in this section.
The process should take approximately 5 to 8 minutes (or even shorter), depending on the file size. After that, you should be able to boot into BIOS and this should add compatibility or fix the instability.

ASUS Crashfree BIOS
If your BIOS got corrupted or the update got interrupted in the middle, you’ll very likely be unable to start your system. In such a case, the CrashFree BIOS feature (available on most ASUS laptops and mobos) should help you recover it.
Since this involves reflashing the BIOS, you’re required to prepare a USB flash drive containing the latest/stable version first. Restart your computer and the ASUS CrashFree BIOS should automatically take you to the EZ Flash Utility.
After successfully bringing your computer back to life, don’t forget to load the optimized defaults and save the settings. Additionally, if you got the “WARNING! BIOS Recovery mode has been detected” error, it should now be solved.
Miscellaneous
Even though the aforementioned BIOS settings are enough for you to complete your ASUS system setup, I might have missed out on a few of them. Here are some of the other interesting features that you may try out.
- Onboard Devices Configuration: This lets you control the link speed of PXIEX16, M.2, and SB modes. Also, you can control LED lighting and USB Power Delivery during different sleep states along with configuring LAN/Wi-Fi/Bluetooth and HD Audio controllers here.
- Additional Boot Configuration: This dedicated section in ASUS BIOS lets you configure Boot Logo Display, POST Delay Time, NVMe Driver Support, Option ROM messages, etc.
- ASUS Secure Erase: When your SSD becomes old, it’s very likely going to show degradation in system performance. With the Secure Erase option in the Tool tab, it will help you completely wipe the selected drive to restore it to factory defaults. But only perform this on compatible SSDs (check your product’s specification page to find out).
- ASUS User Profile: If you’re thinking to store multiple BIOS settings in a single NVRAM chip, ASUS definitely offers this feature as well. You can create multiple profiles and load them whenever required.
.